The Web APIs (aka RESTful Services) are the type of applications that don’t return views in response, instead, they usually consume and return data in a machine-readable format such as XML or JSON. This concept is not new and the main goal of building Web APIs is to serve data to multiple client apps in a centralized way. As the number of the connected apps increase, the usage of the Web APIs can also grow significantly so it is very important to keep in mind the maintainability and scalability in mind. ASP.NET Core provides some powerful features to write Web APIs that comply with the REST standards. This tutorial will serve as a useful guide on how to build and consume Web APIs using the latest version of ASP.NET Core 5.
Table of Contents
Introducing ASP.NET Core Web API
An ASP.NET Core Web API consists of one or more controller classes that derive from ControllerBase. The ControllerBase class provides many properties and methods that are useful for handling HTTP requests You can also derive your class from a Controller class which derives from ControllerBase but that is only recommended if you want to create the same controller for Web APIs and Views.
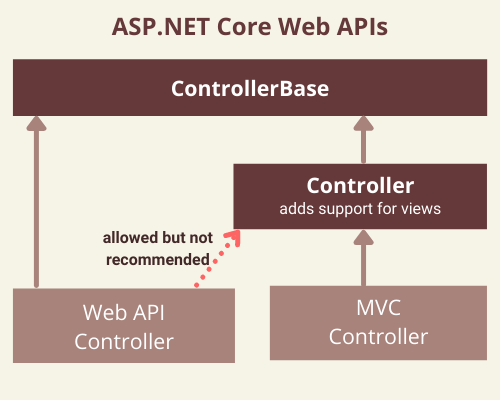
Here are some common methods that ControllerBase provides.
| Method | Notes |
| BadRequest | Returns 400 status code. |
| NotFound | Returns 404 status code. |
| PhysicalFile | Returns a file. |
| TryUpdateModelAsync | Invokes model binding. |
| TryValidateModel | Invokes model validation. |
The Microsoft.AspNetCore.Mvc namespace provides some attributes that can be used to configure the behavior of web API controllers and action methods. The following example uses attributes to specify the supported HTTP action verb and any known HTTP status codes that could be returned:
[HttpPost]
[ProducesResponseType(StatusCodes.Status201Created)]
[ProducesResponseType(StatusCodes.Status400BadRequest)]
public ActionResult<Book> Create(Book book)
{
    ...
}
Here are some common attributes available.
| Attribute | Notes |
| [Route] | Specifies URL pattern for a controller or action. |
| [Bind] | Specifies prefix and properties to include for model binding. |
| [HttpGet] | Identifies an action that supports the HTTP GET action verb. |
| [Consumes] | Specifies data types that an action accepts. |
| [Produces] | Specifies data types that an action returns. |
One of the important attributes is [ApiController] that can be applied to a controller class to enable some special features such as Attribute Routing, Automatic HTTP 400 response, etc. These additional features and behavior improve the developer experience for building APIs.
Creating ASP.NET Core 5 Web API Project
If you are using Visual Studio 2019, then from the File menu, select New > Project. Select the ASP.NET Core Web Application template and click Next. Give your project a name and click Create.
In the Create a new ASP.NET Core Web Application dialog, confirm that .NET Core and ASP.NET Core 5.0 are selected. Select the ASP.NET Core Web API template and click Create.
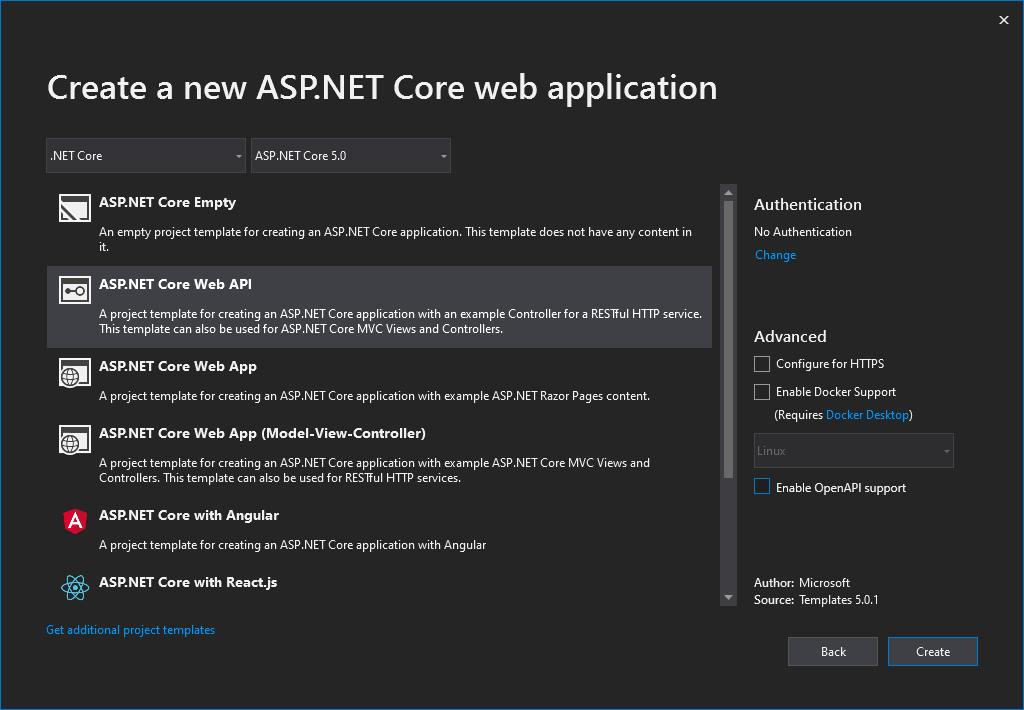
The project template will create a default weather forecast API for you. Press Ctrl+F5 to run without the debugger. You will see the following URL in the browser address bar
https://localhost:/WeatherForecast
and that JSON similar to the following will return from the API:
[
   {
      "date":"2020-12-26T16:57:09.1646732+05:00",
      "temperatureC":20,
      "temperatureF":67,
      "summary":"Cool"
   },
   {
      "date":"2020-12-27T16:57:09.1669352+05:00",
      "temperatureC":51,
      "temperatureF":123,
      "summary":"Hot"
   },
   {
      "date":"2020-12-28T16:57:09.1669397+05:00",
      "temperatureC":29,
      "temperatureF":84,
      "summary":"Hot"
   }
]
The default Web API project template has created the following WeatherForecast model class that has some basic weather related properties.
public class WeatherForecast
{
    public DateTime Date { get; set; }
    public int TemperatureC { get; set; }
    public int TemperatureF => 32 + (int)(TemperatureC / 0.5556);
    public string Summary { get; set; }
}
The project template will also create a default WeatherForecastController class that is derived from the ControllerBase class. The class is also decorated with [Route] and [ApiController] attributes mentioned above.
[ApiController]
[Route("[controller]")]
public class WeatherForecastController : ControllerBase
{

}
Another important thing to notice is that the ConfigureServices method of Startup.cs class is calling AddControllers method and not AddMvc method. This is because if you are not using MVC related features in your Web APIs and you want to keep your Web APIs lightweight with minimum required features then you don’t need to register additional MVC related features.
public void ConfigureServices(IServiceCollection services)
{
    services.AddControllers();
}
Another important piece of code in Startup.cs is where a feature called endpoint routing is configured using the following statements. This allows us to define endpoint routes using the [Route] attribute on top of Web API controllers and actions. We have already seen an example above where [Route(“[controller]”)] attribute is set on WeatherForecastController class.
app.UseEndpoints(endpoints =>
{
   endpoints.MapControllers();
});
The final noticeable thing in the project is the settings configured in Properties\launchSettings.json file which specifies different launch profiles and launchUrl etc.
"IIS Express": {
    "commandName": "IISExpress",
    "launchBrowser": true,
    "launchUrl": "weatherforecast",
    "environmentVariables": {
        "ASPNETCORE_ENVIRONMENT": "Development"
    }
}
Implement CRUD Operations using ASP.NET Core Web API
Now you have the basic knowledge of Web APIs and you have also seen the default Web API created by you using the Visual Studio Web API project template. It is now time to implement our Web APIs and learn Web APIs in more detail. For this tutorial, I have decided to write a fictional web API for a library management system. We will create a RESTful service that allows client applications to manage the library books catalog. The API needs to expose endpoints to create, read, edit, and delete books.
| API | Description | Request body | Response body |
| GET /api/books | Get all books | None | Array of books |
| GET /api/books/{id} | Get a book by Id | None | Book |
| POST /api/books | Add a new book | Book | Book |
| PUT /api/books/{id} | Update an existing book | Book | None |
| DELETE /api/books/{id} | Delete a book | None | None |
The first thing we need is the Book model class. A model class is a class that represents the data associated with an entity e.g. Book. Create a Models folder in the project and add the following class in the Models folder.
public class Book
{
    public int Id { get; set; }
    public string Title { get; set; }
    public int YearPublished { get; set; }
}
The Id property functions as the unique key in a relational database. A book model in a real library system can have dozens of other properties but to keep the example simple, I won’t add any other functionality in the Book class.
Creating Database Context
To handle database operations, we need the Entity Framework data context class. This class represents a session with the database and can be used to query and save instances of your entities e.g. Book. This class is created by deriving from Microsoft.EntityFrameworkCore.DbContext class. Creating a real SQL Server database and managing our books inside the real database is also out of the scope for this tutorial so I have decided to use Microsoft.EntityFrameworkCore.InMemory data provider. This database provider allows Entity Framework Core to be used with an in-memory database. The in-memory database is useful when you want to test some basic database operations without the need of creating a real database. You can download and install both of these packages using the NuGet package manager.
If you don’t know how to use NuGet package manager to install third-party libraries and packages then I will recommend you to read my post Working with Packages and Libraries in ASP.NET Core
Once you have the above packages installed, create the following LibraryContext data context class in your project.
public class LibraryContext : DbContext
{
    public LibraryContext(DbContextOptions<LibraryContext> options)
        : base(options)
    {
    }

    public DbSet<Book> Books { get; set; }
}
Next, we need to register our database context object with the dependency injection container. This will allow us to inject and use our library context in controllers and services. Notice we also specified below that we want to use an in-memory database provider with the database name “LibraryDb”. This in-memory database will be used to store our books entities later in this tutorial.
public void ConfigureServices(IServiceCollection services)
{
    services.AddDbContext<LibraryContext>(opt => opt.UseInMemoryDatabase("LibraryDb"));

    services.AddControllers();
}
If you want to learn more about dependency injection then you can read my post A Step by Step Guide to ASP.NET Core Dependency Injection
Scaffolding Web API Controller in Visual Studio
You can either create Web API controllers manually and implement all those CRUD operations related actions manually or you can take advantage of Visual Studio built-in scaffolding feature and save some time. To create our BookController, right click on the “Controllers” folder and choose the Add > Controller… option. You will see the following dialog in which you need to select “API” from the left-hand side pane. Next select the “API Controller with actions, using Entity Framework” option and click the “Add” button.
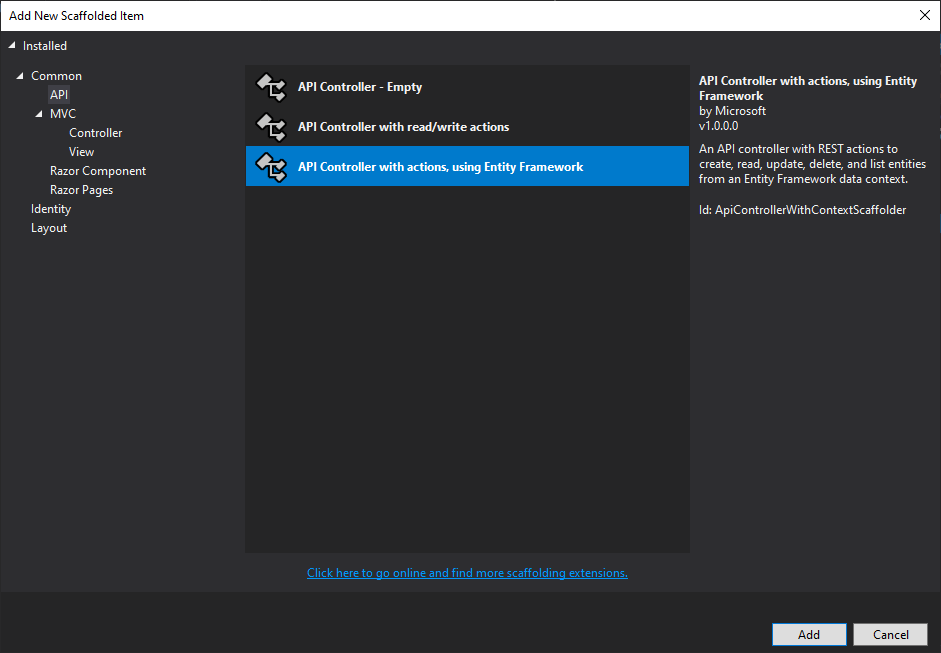
The following dialog will appear where you can provide the name of your controller along with the Model and Data context classes. Click the “Add” button when you have provided all details as shown below:
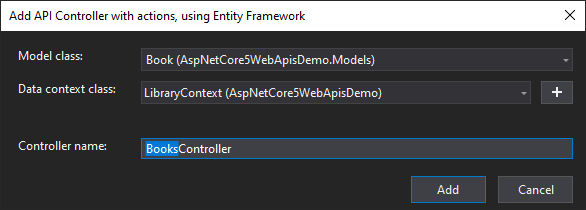
A standard API controller will be generated for you along with all the actions. Notice that the class is marked with the [ApiController] attribute mentioned above and a LibraryContext object is also injected in the constructor of the controller.
[Route("api/[controller]")]
[ApiController]
public class BooksController : ControllerBase
{
    private readonly LibraryContext _context;

    public BooksController(LibraryContext context)
    {
        _context = context;
    }
}
To save us some typing, the following actions are also generated automatically for you.
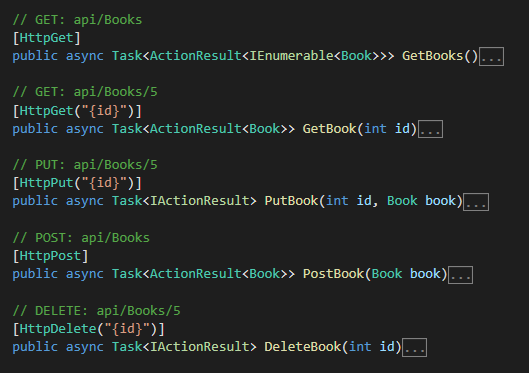
Understanding Web API Action Methods
The first action method we will explore is the PostBook action method. This method will be used to add new books to our in-memory database. The [HttpPost] attribute indicates that this action will be called using the HTTP POST method. The method has a parameter e.g. Book that will be passed to this action from the body of the HTTP request.
The first statement will add the book object in the Books collection available in our data context and the second statement will persist our changes to the database. The last statement is calling the CreatedAtAction method that will automatically return HTTP 201 status code and will also add a Location header to the response. This Location header specifies the URI of the newly created book.
// POST: api/Books
[HttpPost]
public async Task<ActionResult<Book>> PostBook(Book book)
{
    _context.Books.Add(book);
    await _context.SaveChangesAsync();

    return CreatedAtAction("GetBook", new { id = book.Id }, book);
}
We can use tools like Postman or Insomnia to test our APIs quickly without implementing a client application. You can download and install Postman from their website. Once it’s installed, create a new HTTP POST request and set the URI to our API URL. In the Body tab, select the raw radio button and choose type as JSON. Finally, add the following JSON in the request body and click the Send button.
{
  "title":"ASP.NET Web APIs Developer Guide",
  "yearPublished":2020
}
Postman will call our PostBook API mentioned above which will create a new book and finally will send 201 Created status code along with the newly created book as shown in the screenshot below:
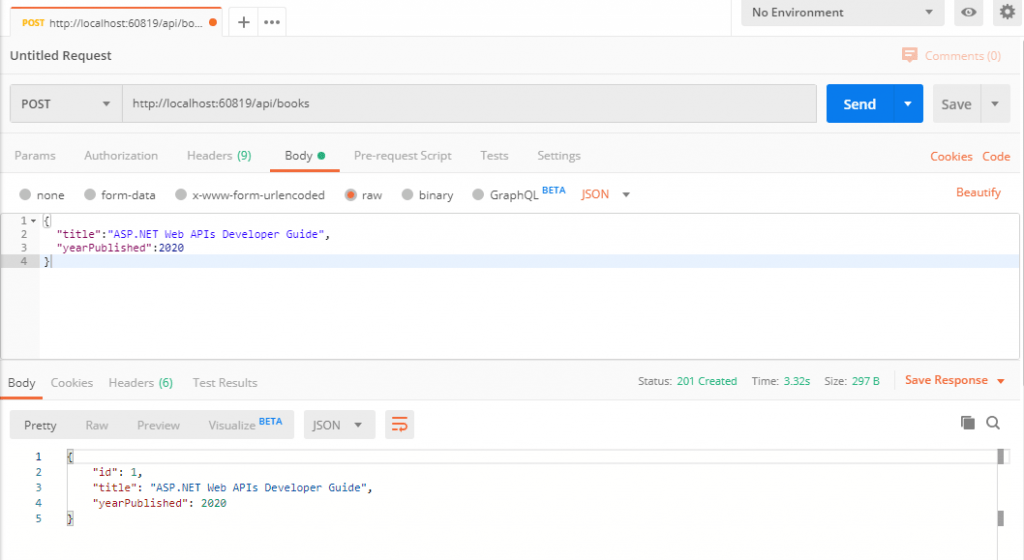
If you will click the Headers tab in Postman, you will notice the Location header is showing the URI to access the newly created book.

You can copy-paste this URL in the browser address bar to view the newly created book.
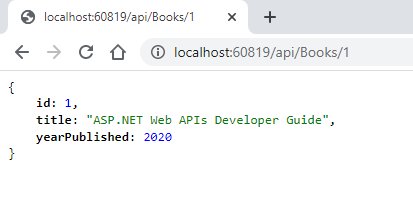
The above URL is calling the following GetBook action that simply searches the book in our in-memory database and return the book.
// GET: api/Books/5
[HttpGet("{id}")]
public async Task<ActionResult<Book>> GetBook(int id)
{
    var book = await _context.Books.FindAsync(id);

    if (book == null)
    {
        return NotFound();
    }

    return book;
}
At this time, you can also test GetBooks action in the browser that will return an array of all the books object available in our in-memory database.
// GET: api/Books
[HttpGet]
public async Task<ActionResult<IEnumerable<Book>>> GetBooks()
{
    return await _context.Books.ToListAsync();
}
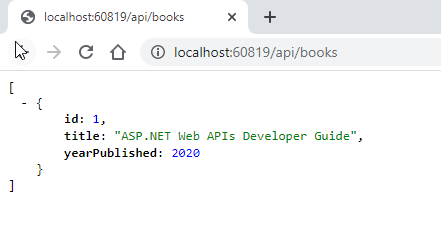
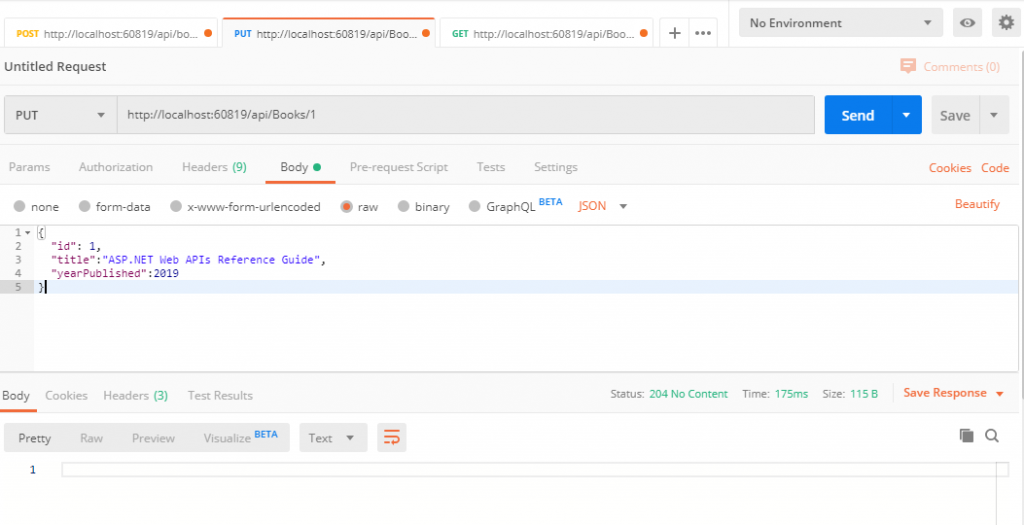
The next method is the PutBook method which can be used to update book entities. It uses the HTTP PUT method and the id of the entity we want to update will be provided as a parameter in the URI. The second parameter is the book entity that contains the updated data. The method will return 400 Bad Request if the specified id is not the same as the id property of the book entity we passed as the parameter. The response of the method will be 204 No Content.
// PUT: api/Books/5
[HttpPut("{id}")]
public async Task<IActionResult> PutBook(int id, Book book)
{
    if (id != book.Id)
    {
        return BadRequest();
    }

    _context.Entry(book).State = EntityState.Modified;

    try
    {
        await _context.SaveChangesAsync();
    }
    catch (DbUpdateConcurrencyException)
    {
        if (!BookExists(id))
        {
            return NotFound();
        }
        else
        {
            throw;
        }
    }

    return NoContent();
}
We are using the in-memory database in this tutorial, so each time the application will start the new database will be initialized. We need to make sure that there is a book entity available in the database before we test the above PutBook action method. The following screen shows the PUT request we made with an updated entity JSON in the body of the request.
Finally, we have the DeleteBook action method that accepts requests with the HTTP DELETE method and simply deletes the entity from the in-memory database.
// DELETE: api/Books/5
[HttpDelete("{id}")]
public async Task<IActionResult> DeleteBook(int id)
{
    var book = await _context.Books.FindAsync(id);
    if (book == null)
    {
        return NotFound();
    }

    _context.Books.Remove(book);
    await _context.SaveChangesAsync();

    return NoContent();
}
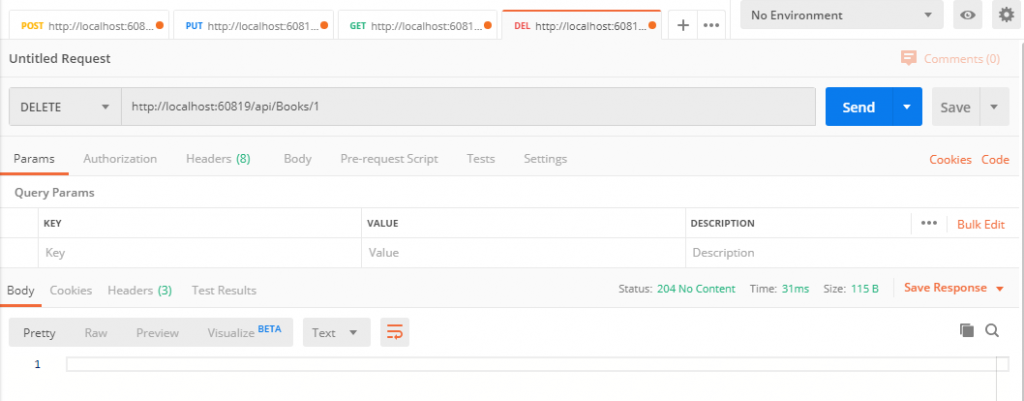
The following screenshot shows how to test the DeleteBook action method in Postman.
Summary
ASP.NET Core is a great framework to use when you are planning to build clean, scalable, and maintainable Web APIs. It has lots of useful APIs and features related to Web APIs and we can write a whole book on just Web APIs. This tutorial is a basic guide for developers who want to get started with ASP.NET Core Web APIs. I hope you enjoyed this tutorial and I will appreciate it if you can leave your feedback below to let me know how can I improve my tutorials further.



incredible intro tutorial 👏
Excellent post i wish i knew how to write like that i never get tired of reading your posts what a wonderful article.
Thank you!
Very nice Sir.