These days, it is a common trend to build a single page application (SPA) using a modern front-end web framework such as Angular, React, Vue, etc., and a server-side backend Web API. In this tutorial, I will walk you through a complete example of creating a single page application using Angular that will connect a server-side ASP.NET Core 5 Web API to fetch data from a SQL Server database using Entity Framework Core (Code First). At the end of this tutorial, you will be able to display some useful stats related to football players.
Table of Contents
What is a Single Page Application (SPA)
A single page application (SPA) is a type of web application that doesn’t load entire new pages from the server in an old and traditional way but instead loads data and contents from the server dynamically. SPA loads all necessary HTML, JavaScript, and CSS with a single page load, and the remaining resources are loaded dynamically usually from a backend Web API, and added to the page on different user actions. This technique results in an improved user experience because the user stays on the same page and control is never transferred to another page. Some popular examples of SPAs are Gmail, Facebook, Google Maps, Twitter, Pinterest, etc. There are many front-end frameworks to build SPAs and the most popular ones are React by Facebook and Angular by Google. Angular is the go-to option for developers who want to develop cross-platform, efficient, and sophisticated single-page apps using HTML, CSS, and TypeScript.
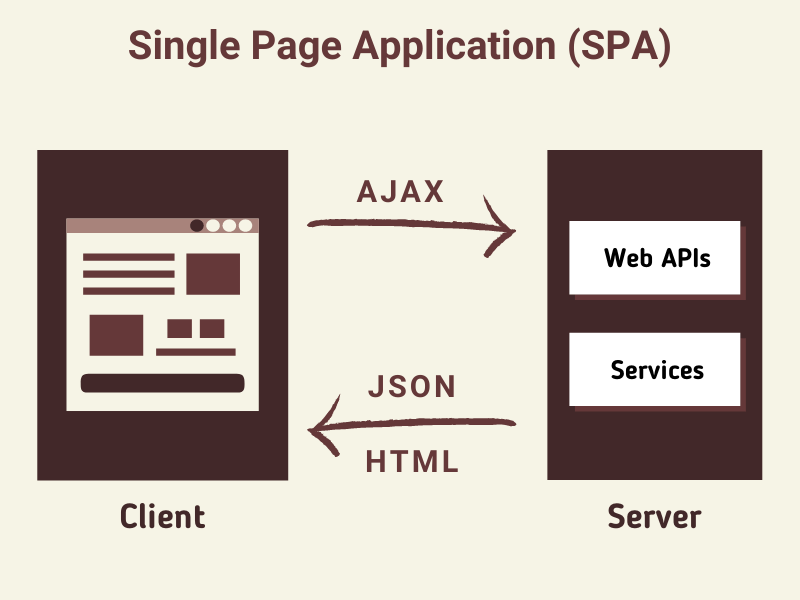
Creating Angular SPA in Visual Studio 2019
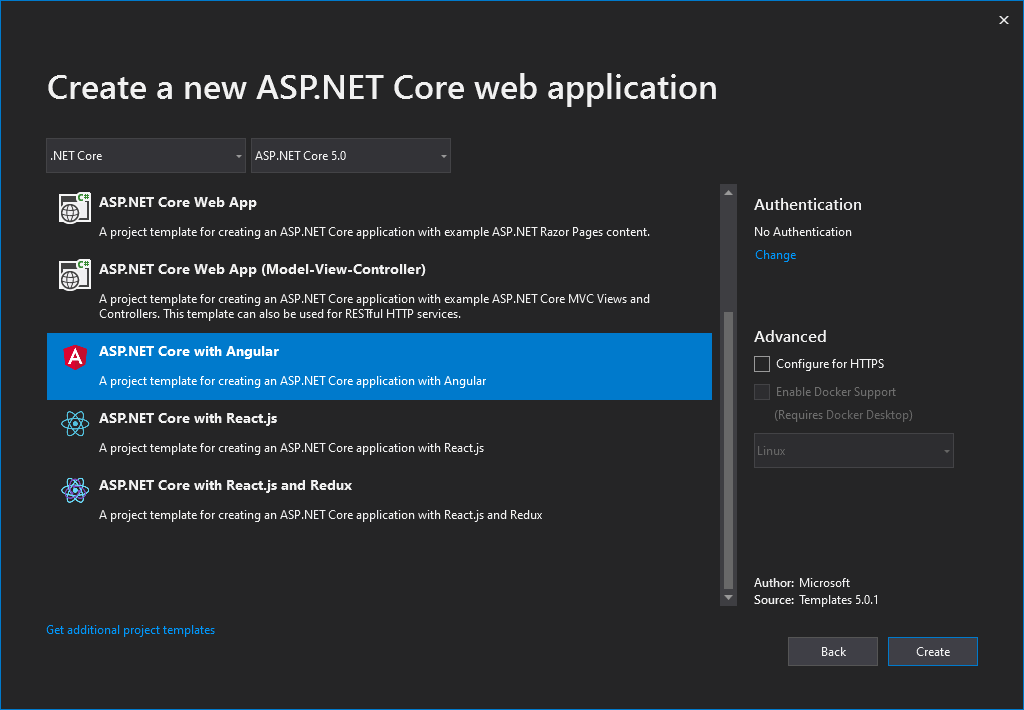
Open Visual Studio 2019 and create a standard ASP.NET Core Web Application project. Make sure ASP.NET Core 5.0 version is selected and you are choosing ASP.NET Core with Angular template as shown in the following screenshot.
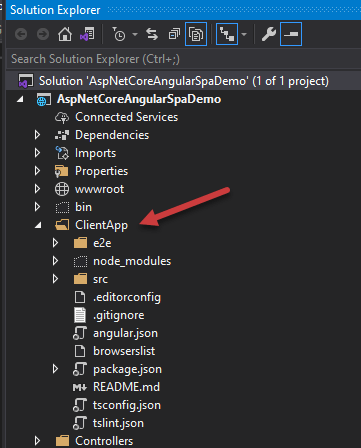
The above project template will generate a standard ASP.NET Core Web Application and a folder called ClientApp that contains the Angular client-side application.
You will also notice that a default Web API controller named WeatherForecastController is also created for us in the Controllers folder that simply returns a list of WeatherForecast objects that contains some random forecast information.
[ApiController]
[Route("[controller]")]
public class WeatherForecastController : ControllerBase
{
    private static readonly string[] Summaries = new[]
    {
        "Freezing", "Bracing", "Chilly", "Cool", "Mild", "Warm", "Balmy", "Hot", "Sweltering", "Scorching"
    };

    [HttpGet]
    public IEnumerable<WeatherForecast> Get()
    {
        var rng = new Random();
        return Enumerable.Range(1, 5).Select(index => new WeatherForecast
        {
            Date = DateTime.Now.AddDays(index),
            TemperatureC = rng.Next(-20, 55),
            Summary = Summaries[rng.Next(Summaries.Length)]
        }).ToArray();
    }
}
Before we start our implementation, the first thing we need to make sure is that we can run our Angular App in the browser and the app can load weather forecast information on the page. To do this, you need to install Angular CLI and need to run some commands.
Right-click on the ClientApp folder and choose the Open in Terminal command from the context menu.
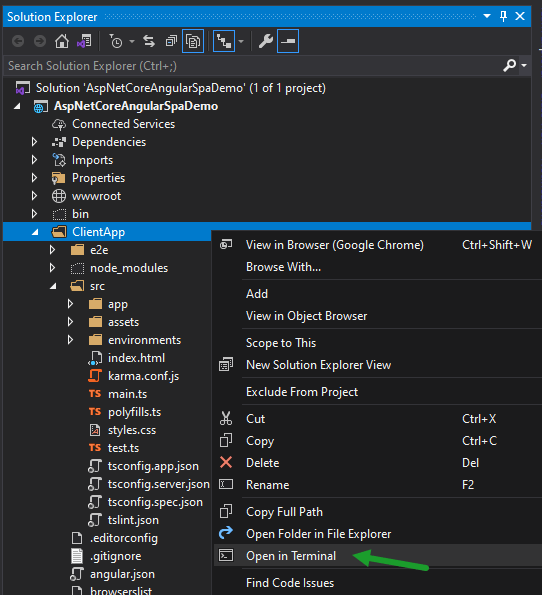
Visual Studio will open the Developer PowerShell window that can be used to run basic npm package manager commands. Let’s install the Angular CLI with the following command.
npm install -g @angular/cli

Next, run the following command that will serve the Angular SPA in the browser.
npm run ng serve
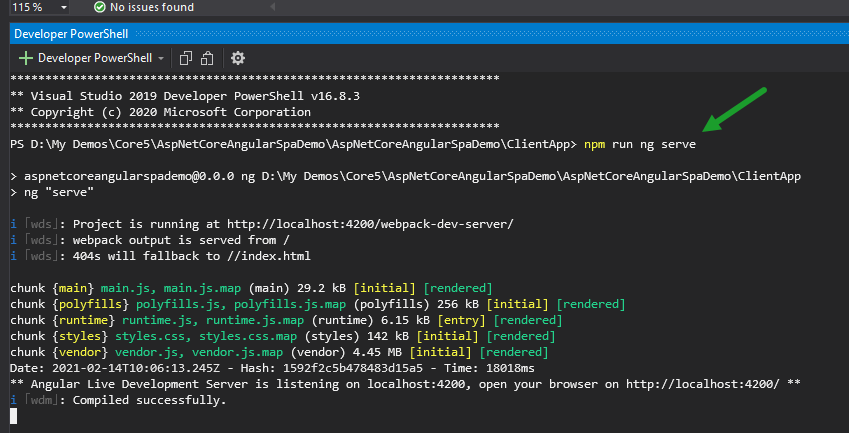
Press F5 to start debugging and now you should be able to see the Angular SPA app opening in the browser. The default Angular App has three pages Home, Counter, and Fetch data. You can click the links shown on the navigation bar to navigate to these pages and notice that when you are navigating from one page to another page, there is no full page load from the server and the app is loading pages very quickly without a full postback to the server. Open the Fetch data page and you will notice that this page is calling the back end ASP.NET Core Web API and displaying weather information.
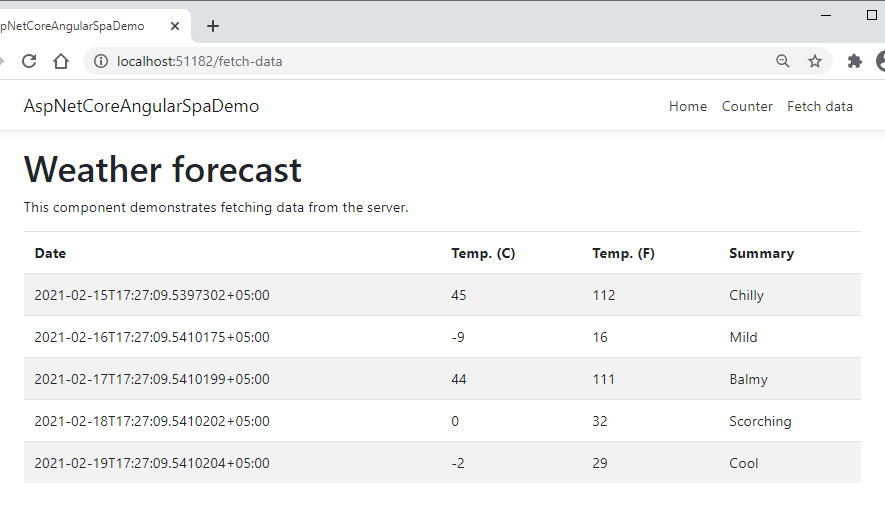
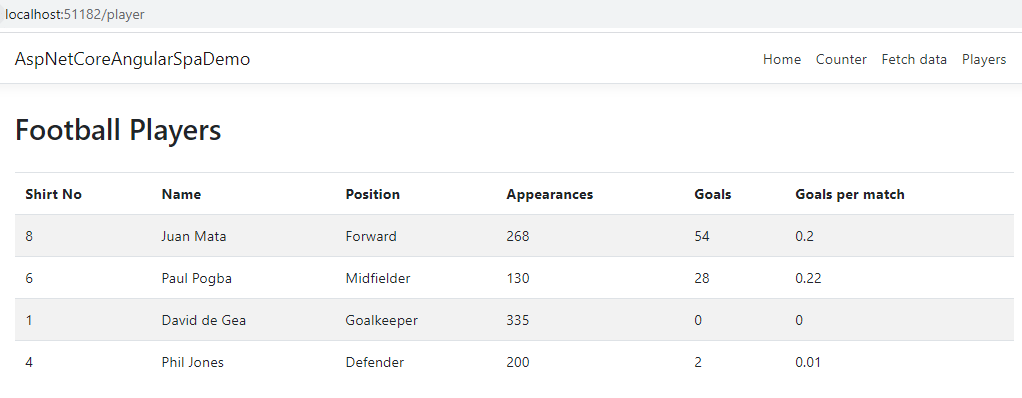
So far, we haven’t written a single line of code and we are just running the default Angular SPA app created by Visual Studio. It is now time to implement our custom feature in this application. I will create a new page that will display the following information about some Football players.
Setting Up Database with Entity Framework Core (Code First)
We need to set up a database to store the player’s information and I have decided to use Entity Framework Code First approach for this tutorial. Install Microsoft.EntityFrameworkCore.SqlServer, Microsoft.EntityFrameworkCore.Design and Microsoft.EntityFrameworkCore.Tools NuGet packages in the project to perform some EF Core related development tasks.
Next, we need to create our entity models and we normally put our models in the Models folder by convention so let’s create a Models folder in the project root folder and create the following Player model class. Notice, how I used [NotMapped] attributes with some computed properties as I don’t want EF Core to generate database columns for those properties. The values of these properties can be calculated at runtime using the data available in other properties that’s why we normally don’t save such properties in the database.
public class Player
{
    [Key]
    public int Id { get; set; }

    [Required]
    public string Name { get; set; }

    public int ShirtNo { get; set; }
    public int Appearances { get; set; }
    public int Goals { get; set; }
    public PlayerPositions Position { get; set; }

    [NotMapped]
    public string PositionName => Position.ToString();

    [NotMapped]
    public decimal GoalsPerMatch => Math.Round((decimal)Goals / (decimal)Appearances, 2);
}
The Player class also has a property Position which is an Enum type property so create the following enum in the Models folder.
public enum PlayerPositions
{
    Goalkeeper,
    Defender,
    Midfielder,
    Forward
}
Next, create a Data folder in the project and create the DbContext class named FootballDbContext in this folder. The DbContext is the most important class of Entity Framework because an instance of DbContext represents a session with the database which can be used to query and save instances of our entities to a database. I am also overriding the OnModelCreating method to seed some player’s information into the database table.
public class FootballDbContext : DbContext
{
    public FootballDbContext(DbContextOptions<FootballDbContext> options)
        : base(options)
    {

    }

    public DbSet<Player> Players { get; set; }

    protected override void OnModelCreating(ModelBuilder modelBuilder)
    {
        modelBuilder.Entity<Player>().HasData(
            new Player() { Id = 1, Name = "Juan Mata", ShirtNo = 8, Appearances  = 268, Goals = 54, Position = PlayerPositions.Forward},
            new Player() { Id = 2, Name = "Paul Pogba", ShirtNo = 6, Appearances  = 130, Goals = 28, Position = PlayerPositions.Midfielder},
            new Player() { Id = 3, Name = "David de Gea", ShirtNo = 1, Appearances  = 335, Goals = 0, Position = PlayerPositions.Goalkeeper},
            new Player() { Id = 4, Name = "Phil Jones", ShirtNo = 4, Appearances  = 200, Goals = 2, Position = PlayerPositions.Defender }
        );
    }
}
Next, we need to define our database connection string and we can save the connection string in the appsettings.json file. Please note that you need to specify your database server name instead of DB_SERVER in the following connection string.
"ConnectionStrings": {
    "DefaultConnection": "Server=DB_SERVER; Database=FootballDb; Trusted_Connection=True; MultipleActiveResultSets=true"
}
Next, we need to register the SQL Server database provider in Startup.cs file using the UseSqlServer method. The UseSqlServer method requires a database connection string and we can pass this information using the GetConnectionString method.
public void ConfigureServices(IServiceCollection services)
{
    services.AddControllersWithViews();

    // In production, the Angular files will be served from this directory
    services.AddSpaStaticFiles(configuration =>
    {
        configuration.RootPath = "ClientApp/dist";
    });

    services.AddDbContext<FootballDbContext>(options =>
        options.UseSqlServer(Configuration.GetConnectionString("DefaultConnection")));
}
Finally, we are ready to generate our database with the help of EF Core migrations. Migrations allow us to easily create a new database and then incrementally update the database schema to keep it in sync with the application models. You can run migrations using .NET Core CLI tools outside Visual Studio or you can use Package Manager Console tools available in Visual Studio. For this tutorial, I will use Package Manager Console tools so let open Package Manager Console and add the following migration.
Add-Migration InitialDbCreateAndSeedData
EF Core will create a directory called Migrations in the project and will also generate some files in the folder. We are now ready to create our database and Player table using the migrations code generated by EF Core. This can be done by running the following command in Package Manager Console.
Update-Database
Open SQL Server database and you should see a new database FootballDb in the list of databases and if you will open the Players table you will see all of our data is seeded in the table.
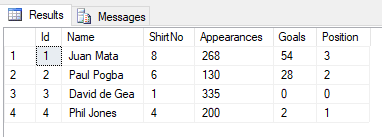
If you want to learn EF Code First in detail then you can read my post Data Access in ASP.NET Core using EF Core (Code First). I also have a post about EF Core Database First Data Access in ASP.NET Core using EF Core (Database First) in case you are interested.
Creating ASP.NET Core Web API for Angular SPA
Angular apps can make Ajax based server-side calls and load and display data from backend APIs. We need to create an ASP.NET Core Web API to return Player’s data that can be consumed by the Angular front-end app. Let’s create an API Controller PlayerController in the Controllers folder and inject FootballDbContext in the constructor.
[ApiController]
[Route("api/[controller]")]
public class PlayerController : ControllerBase
{
    private readonly FootballDbContext _context;

    public PlayerController(FootballDbContext context)
    {
        _context = context;
    }
}
Next, implement the following GetPlayers method which is simply returning all players from the Player table we created above.
[HttpGet]
public async Task<ActionResult<IEnumerable<Player>>> GetPlayers()
{
    return await _context.Players.ToListAsync();
}
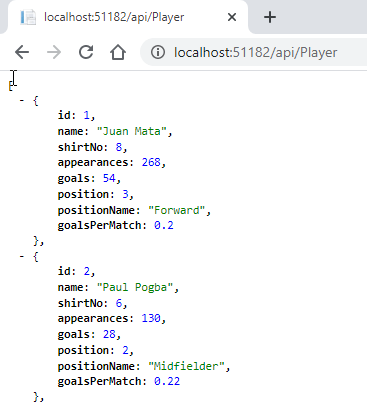
Open the browser and test the API by adding api/Player in the URL as shown below. You should be able to see the player’s data in JSON format.
If you want to learn more about ASP.NET Core Web APIs then read my tutorial A Developer’s Guide for Creating Web APIs with ASP.NET Core 5
Creating Angular Component to Consume ASP.NET Core Web API
Angular is a modular framework which means modules are the basic building block of the angular app. Each app must have at least one module which is called the root module and by default, it is defined in the app.module.ts file available in ClientApp/src/app folder
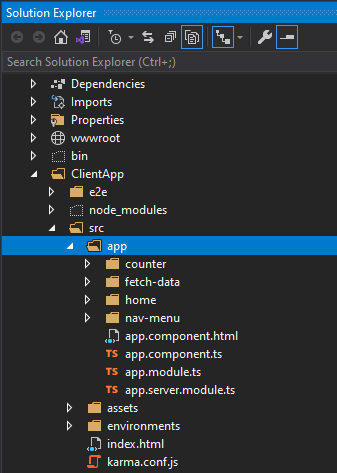
Angular modules can define both the components and services in them. Components are used to define different parts of the application. For example, in the above screenshot, you can see that all three pages of our Angular App Home, Counter, and Fetch data are defined as components and all of these components have their folders within the app folder with the names home, counter, and fetch-data.
A component consists of a view and a TypeScript class where the view defines the look and feel of the component using HTML and CSS and the class defines the functionality/behavior of the component using TypeScript. Every app must have at least one component also called root components and usually available in app.component.ts file also shown in the above screenshot.
For our app, we want to add another component player that will display all players coming from a backend Web API. You can add a new component from the command prompt using the following Angular CLI command
ng generate component player
If you don’t want to use Angular CLI you can also add a player folder in the app folder and add the following two files manually.
- player.component.ts
- player.component.html
Open the player.component.ts file and define your component as follows.
import { Component, Inject } from '@angular/core';
import { HttpClient } from '@angular/common/http';

@Component({
  selector: 'app-player',
  templateUrl: './player.component.html'
})
export class PlayerComponent {
  public players: Player[];

  constructor(http: HttpClient, @Inject('BASE_URL') baseUrl: string) {
    http.get<Player[]>(baseUrl + 'api/Player').subscribe(result => {
      this.players = result;
    }, error => console.error(error));
  }
}

interface Player {
  id: number;
  name: string;
  shirtNo: number;
  appearances: number;
  goals: number;
  positionName: number;
  goalsPerMatch: number;
}
The PlayerComponent class is calling our api/Player Web API using HttpClient and initializing the player’s property of the class with the data loaded from the backend. We can now use this player’s property in the view file player.component.html attached with the component using the templateUrl option.
<h1 id="tableLabel">Football Players</h1>
<p *ngIf="!players"><em>Loading...</em></p>
<table class='table table-striped' aria-labelledby="tableLabel" *ngIf="players">
   <thead>
      <tr>
         <th>Shirt No</th>
         <th>Name</th>
         <th>Position</th>
         <th>Appearances</th>
         <th>Goals</th>
         <th>Goals per match</th>
      </tr>
   </thead>
   <tbody>
      <tr *ngFor="let player of players">
         <td>{{ player.shirtNo }}</td>
         <td>{{ player.name }}</td>
         <td>{{ player.positionName }}</td>
         <td>{{ player.appearances }}</td>
         <td>{{ player.goals }}</td>
         <td>{{ player.goalsPerMatch }}</td>
      </tr>
   </tbody>
</table>
The above view code is also pretty straightforward. I am using ngif directive to render Loading… if players’ property is not yet initialized. The ngif directive conditionally includes a template based on the value of an expression. If the expression evaluates to true, Angular renders the template.
<p *ngIf="!players"><em>Loading...</em></p>
The next important piece of code is where I am using ngFor to iterate all the players and displaying each player property in standard HTML td element.
<tr *ngFor="let player of players">
   <td>{{ player.shirtNo }}</td>
   <td>{{ player.name }}</td>
   <td>{{ player.positionName }}</td>
   <td>{{ player.appearances }}</td>
   <td>{{ player.goals }}</td>
   <td>{{ player.goalsPerMatch }}</td>
</tr>
Once our player component is complete, we need to register it in app.module where all application modules are declared.
import { BrowserModule } from '@angular/platform-browser';
import { NgModule } from '@angular/core';
import { FormsModule } from '@angular/forms';
import { HttpClientModule } from '@angular/common/http';
import { RouterModule } from '@angular/router';

import { AppComponent } from './app.component';
import { NavMenuComponent } from './nav-menu/nav-menu.component';
import { HomeComponent } from './home/home.component';
import { CounterComponent } from './counter/counter.component';
import { FetchDataComponent } from './fetch-data/fetch-data.component';
import { PlayerComponent } from './player/player.component';

@NgModule({
  declarations: [
    AppComponent,
    NavMenuComponent,
    HomeComponent,
    CounterComponent,
    FetchDataComponent,
    PlayerComponent
  ],
  imports: [
    BrowserModule.withServerTransition({ appId: 'ng-cli-universal' }),
    HttpClientModule,
    FormsModule,
    RouterModule.forRoot([
      { path: '', component: HomeComponent, pathMatch: 'full' },
      { path: 'counter', component: CounterComponent },
      { path: 'fetch-data', component: FetchDataComponent },
      { path: 'player', component: PlayerComponent }
    ])
  ],
  providers: [],
  bootstrap: [AppComponent]
})
export class AppModule { }
Finally, you need to add a new menu item on top of the page so that you can navigate to the players component and see list of players. Open the nav-menu.component.html file and declare the Players menu item as shown below:
<ul class="navbar-nav flex-grow">
	<li class="nav-item" [routerLinkActive]="['link-active']" [routerLinkActiveOptions]="{ exact: true }"> <a class="nav-link text-dark" [routerLink]="['/']">Home</a> </li>
	<li class="nav-item" [routerLinkActive]="['link-active']"> <a class="nav-link text-dark" [routerLink]="['/counter']">Counter</a> </li>
	<li class="nav-item" [routerLinkActive]="['link-active']"> <a class="nav-link text-dark" [routerLink]="['/fetch-data']">Fetch data</a> </li>
	<li class="nav-item" [routerLinkActive]="['link-active']"> <a class="nav-link text-dark" [routerLink]="['/player']">Players</a> </li>
</ul>
We have written lots of code and it is now time to see everything in action. Run the application using the method specified at the start of this tutorial and click the Players menu item shown on top of the page. You should see the page similar to the following with all player’s information.

Summary
Angular is a powerful front-end framework for building interactive model applications and when you combine this with the ASP.NET Core Web APIs backend, you can build some seriously amazing apps. In this tutorial, I have just covered the basics of combining Angular with ASP.NET Core. There is a lot more to explore and I will try to write more useful posts on these two technologies. If you have enjoyed this post, please share it with others and spread the knowledge.


Really Good one
Excelente para iniciantes em SPA/Angular/VisualStudio como eu.!
Grato.
This is really great thanks for making this.
Really good – points out the main bits of studio-angular integration that I wanted. Coming to this from a c# background and knowing a little about angular, I found this really useful when diving into our in house angular project.