JQuery is truly a fantastic technology introduced for web developers in last few years. If you have been using it in your ASP.NET projects for some time, you may have already been playing many cool tricks on your web pages by combining it with powerful ASP.NET server side controls. It’s fairly straight forward to use JQuery with controls such as buttons, textboxes etc.. However, some of the ASP.NET controls make life very difficult due to the HTML they render on the page. One such control is ASP.NET CheckBoxList control and in this tutorial I will show you how you can use JQuery to get the selected checkbox item’s labels as well as their values.

To get started, create an ASP.NET website project in Visual Studio and drag CheckBoxList control on the page along with one HTML button control and two span elements as shown in the following HTML markup. The button onclick event is calling btnShow_onclick() JavaScript function which I will show you later in this tutorial.
<asp:CheckBoxList ID="CheckBoxList1" runat="server">
   <asp:ListItem Text="Google" Value="1" />
   <asp:ListItem Text="Yahoo" Value="2" />
   <asp:ListItem Text="Bing" Value="3" />
</asp:CheckBoxList>

<br />

<input id="btnShow" type="button" value="Show Selected Items"
   onclick="return btnShow_onclick()" />

<br />

<span id="spnLabels"></span>

<br />

<span id="spnValues"></span>

<br />
Build and test your webpage in the browser and check the html source code rendered by the CheckBoxList control using typical browser “View Source” option. You will see the following markup generated in the page. Notice, how the Text property of <asp:ListItem> tag is rendered as html <label> tag and the value of id attributes of input tags is same as the value of the for attribute in <label> tags.
<table id="CheckBoxList1" border="0">
   <tr>
      <td>
          <input id="CheckBoxList1_0" type="checkbox" name="CheckBoxList1$0" />
          <label for="CheckBoxList1_0">Google</label>
      </td>
   </tr>
   <tr>
      <td>
         <input id="CheckBoxList1_1" type="checkbox" name="CheckBoxList1$1" />
         <label for="CheckBoxList1_1">Yahoo</label>
      </td>
   </tr>
   <tr>
      <td>
         <input id="CheckBoxList1_2" type="checkbox" name="CheckBoxList1$2" />
         <label for="CheckBoxList1_2">Bing</label>
      </td>
   </tr>
</table>
Another important thing to note is that the Value property of <asp:ListItem> tag is not rendered at all in the final markup. So how you can get the values 1, 2, or 3 at the client side in JQuery code? The answer is that you need to add the values yourself for each item rendered by the CheckBoxList control. Add the following code in the Page Load event in code behind file and run and test your page once again.
foreach (ListItem item in CheckBoxList1.Items)
{
   item.Attributes.Add("hiddenValue", item.Value);
}
Build and Run your webpage after adding the above loop. The CheckBoxList control generated markup will be slightly different this time and ASP.NET will render additional <span> tags with the hiddenValue attribute you added in the above foreach loop. The following markup shows the generated HTML.
<table id="CheckBoxList1" border="0">
   <tr>
      <td>
         <span hiddenValue="1">
            <input id="CheckBoxList1_0" type="checkbox" name="CheckBoxList1$0" />
            <label for="CheckBoxList1_0">Google</label>
         </span>
      </td>
   </tr>
   <tr>
      <td>
         <span hiddenValue="2">
            <input id="CheckBoxList1_1" type="checkbox" name="CheckBoxList1$1" />
            <label for="CheckBoxList1_1">Yahoo</label>
         </span>
      </td>
   </tr>
   <tr>
      <td>
         <span hiddenValue="3">
            <input id="CheckBoxList1_2" type="checkbox" name="CheckBoxList1$2" />
            <label for="CheckBoxList1_2">Bing</label>
         </span>
      </td>
   </tr>
</table>
Once you have your items values and names rendered by the CheckBoxList control. You are ready to access these names and values on the client side using JQuery. Add the JQuery script file reference in the <head> section of the page.
<script src="scripts/jquery-1.4.3.min.js" type="text/javascript"></script>
Add a JavaScript code block and define the btnShow_onclick() function in it with the following code.
<script type="text/javascript">

   function btnShow_onclick() {

      $("#spnLabels").text("");
      $("#spnValues").text("");

      var labels = "";
      var values = "";

      $("#<%= CheckBoxList1.ClientID %> input:checkbox:checked").each(function() {
         var label = $('label[for=' + this.id + ']').html();
         var value = $(this).parent().attr('hiddenValue');

         labels += label + ", ";
         values += value + ", ";
      });

      labels = labels.substring(0, labels.length - 2);
      values = values.substring(0, values.length - 2);

      $("#spnLabels").text(labels);
      $("#spnValues").text(values);
   }

</script>
The span tags spnLabels and spnValues defined in the ASP.NET page markup will be used to display the selected checkboxes labels and values. So, the first two lines make sure that <span> tags are empty every time user click the Show Selected Items button.
$("#spnLabels").text("");
$("#spnValues").text("");
Next I am using JQuery input:checkbox:checked selector to get each selected checkbox in the CheckBoxList control and then using JQuery each() function to iterate all the selected checkboxes.
$("#<%= CheckBoxList1.ClientID %> input:checkbox:checked").each(function() {
   var label = $('label[for=' + this.id + ']').html();
   var value = $(this).parent().attr('hiddenValue');

   labels += label + ", ";
   values += value + ", ";
});
Inside the each() function handler, I have used the id of the current input tag to retrieve the text rendered inside each <label> element. As you know already that the id of input tag is same as the value of for attribute inside <label>elements so it will work perfectly well.
var label = $('label[for=' + this.id + ']').html();
Next, I am using another JQuery function parent() to access the <span> element rendered by the CheckBoxList control and retrieving the value of hiddenValue attributes which we rendered in the ASP.NET page load event using the foreach loop. Once we have label and value available I simply concatenated them with the labels and values variables declared in the code. Finally, I am showing them on spnLabels and spnValues using the JQuery text() function.
$("#spnLabels").text(labels);
$("#spnValues").text(values);
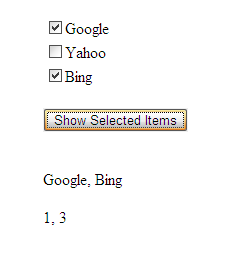
Build and run your project and try to select different items from the CheckBoxList control before clicking Show Selected Items button. If you have implemented everything as I explained then you will see the results similar to the figure shown in the start of this tutorial. If you are lazy like me and want to see this tutorial in action without writing anything yourself, click the Live Demo button.


Good article.
Awesome information…I was stuck for a long time in the same scenario and your solution worked for me like a charm.
nice thks!!
Its kool man, I tried it and it worked for me.
Thanks for such a wonderful article
Thanks!!!!!!!!!!
very good article, I tried this and worked fine. thank you very much.
Interesting. Thank you for sharing some new tips.