JQuery API has many CSS related functions, which can be used to create many UI effects in the modern web applications. The most common of those methods are addClass, removeClass and toggleClass, which add, remove or toggle CSS classes to any matched element. In this Tutorial, I will show you how you can create a simple mouseover hover effect on ASP.NET GridView Rows using JQuery CSS related methods.
To get things started, create an ASP.NET website and add a GridView control to the page from the Data Category in Toolbox. The following code shows the GridView control I am using for the demonstration of this tutorial. Please set the appropriate properties as shown in the code snippet below.
<form id="form1" runat="server">

   <asp:GridView ID="GridView1" runat="server" BackColor="White" Font-Size="10"
      Font-Names="Verdana" BorderColor="#000000" BorderStyle="Solid" BorderWidth="1px"
      CellPadding="3" Width="400px" CellSpacing="0" GridLines="Horizontal">
   </asp:GridView>

</form>
Next I am binding the GridView with a DataTable object that I created in the Page Load event in the code behind file. To keep things simple I am not connecting any database as it is not the purpose of this tutorial. I created a DataTable object with three columns and filled it with some rows using for loop. The complete code of the Page Load event is shown below:
protected void Page_Load(object sender, EventArgs e)
{
   DataTable table = new DataTable();
   table.Columns.Add("ID", typeof(int));
   table.Columns.Add("Name", typeof(string));
   table.Columns.Add("Salary", typeof(decimal));

   for (int i = 1; i < 8; i++)
   {
      DataRow row = table.NewRow();
      row["ID"] = i;
      row["Name"] = "Name " + i;
      row["Salary"] = 10000 * i;
      table.Rows.Add(row);
   }

   GridView1.DataSource = table;
   GridView1.DataBind();

   if (GridView1.Rows.Count > 0)
   {
      GridView1.UseAccessibleHeader = true;
      GridView1.HeaderRow.TableSection = TableRowSection.TableHeader;
   }
}
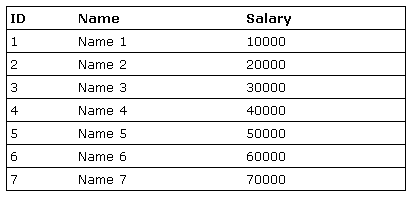
By default, The GridView control doesn’t render the <th> tags for the header row which can be an issue for sites where standard compliance and accessibility are important. When we set the property UseAccessibleHeader = true, it replaces the <td> elements of the header row with the correct <th> element. The HeaderRow.TableSection property of GridView control generates <thead> and <tbody> tags to make generated code more accessible. Build and run your project, and you will see the following output.

Although the above output looks very simple but the important thing to note is the HTML generated by the GridView control. Please check the source code of the page from the browser View Source option and see the HTML table code is generated. Next you need to add following CSS style rules inside the <head> section of the page. We will use the headerRow, highlightRow and selectedRow CSS classes in JQuery code in few minutes.
<style type="text/css">
   th
   {
      text-align:left;
   }
   .headerRow
   {
      background-color: #000000;
      color:White;
      font-weight:bold;
   }
   .highlightRow
   {
      background-color: #dadada;
      cursor: pointer;
      border:solid 1px black;
   }
   .selectedRow
   {
      background-color: #808080;
      cursor: pointer;
      border:solid 1px black;
      color:White;
   }
</style>
Next add the JQuery script file reference inside the <head> section of the page depending on the script file location and JQuery version you are using.
<script src="scripts/jquery-1.4.3.min.js" type="text/javascript"></script>
Next add the following JQuery code inside a script block in<head>section of the page.
<script type="text/javascript">
   $(document).ready(function () {

      $('#GridView1 thead').addClass('headerRow');

      $('#GridView1 tbody tr').mouseover(function () {
         $(this).addClass('highlightRow');
      }).mouseout(function () {
         $(this).removeClass('highlightRow');
      }).click(function () {
         $(this).toggleClass('selectedRow');
      });

   });
</script>
The code defines typical JQuery ready method, which is used to access and manipulate DOM elements when they are loaded by the browser. The first line of code uses a JQuery selector to select<thead>section of the html table and adds a CSS class to the element using JQuery API addClass method.
$('#GridView1 thead').addClass('headerRow');
Next I am adding a sequence of three JQuery events mouseover, mouseout and click to the table rows<tr>elements.
$('#GridView1 tbody tr').mouseover(function () {
   $(this).addClass('highlightRow');
}).mouseout(function () {
   $(this).removeClass('highlightRow');
}).click(function () {
   $(this).toggleClass('selectedRow');
});
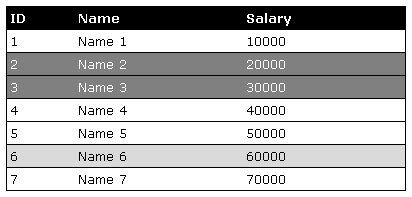
Each one of these events takes a function handler as a parameter in which you can write code you want to execute when these events occur on table rows. I am using addClass method to add CSS class inside mouseover event handler and removing the same CSS class using the removeClass method inside mouseout event handler. This will give you hover effect when you will move the mouse on table rows. The click event handler uses JQuery API toggleClass method which adds or removes CSS classes based on the class presence. You can read more about these methods at the following URL on JQuery website.
http://api.jquery.com/category/css If you have followed the complete tutorial with me you will see the GridView with mouseover hover and click effects as shown in the following figure.

I hope you have enjoyed this tutorial as much as I have enjoyed writing it. You can download the full source code of this tutorial by clicking the Download Source Code button at the top of this page. You can also watch the live demo by clicking the Live Demo button.


Very good how to:) everything works perfectly.
Thank you.
Hi,
I implemented your code on my gridview and it does not work. I checked your code and you are not using a Master page. Mine is using one. Would that be the problem?
Alos, my JQuery version is jquery-1.4.1.js. How do you upgrade this. Yours is 1.4.3.
If you are using MasterPage then the only problem I could guess is may be the controls generated id. ASP.NET generate different Ids for controls if you are using MasterPages or UserControls.
This is a very very exciting article which has help me a lot to solve my problem. Thanks a lot.
This is Great Sir…and live demo addition is also Good…