Imagine that you are working on an existing application that sends notifications to other programs. The initial version of that application was only sending notifications by email but now you are asked to add some additional features in that library so that it can start sending notifications by SMS, or can send notifications to Facebook, Twitter, etc., or a combination of many other apps. You don’t want to modify existing code, you don’t want to create a big hierarchy of child and grandchild classes and still, you want to enhance the existing application. This is where the Decorator Pattern will come to rescue you and will allow you to dynamically add or remove functionality to existing classes.
Table of Contents
What is a Decorator Pattern?
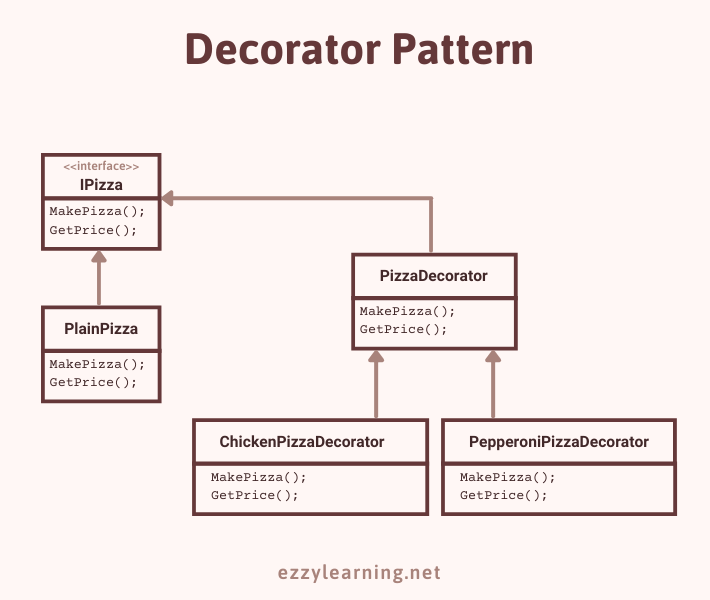
The decorator pattern (also known as Wrapper) is a structural design pattern and it allows developers to dynamically add new behaviors and features to existing classes without modifying them thus respecting the open-closed principle. This pattern lets you structure your business logic into layers (wrappers) in a way that each layer adds some additional behavior or functionality to an existing object, promoting separation of concern. Furthermore, these layers can be added or removed at runtime and clients can also use the different combinations of decorators to be attached to an existing object.
Ordering a pizza is a good real-world example of a decorator pattern. When we order pizza, we can request our pizza to be decorated with different types of toppings. We can request cheese topping, pepperoni topping, or a combination of many other toppings available.

Pros of Decorator Pattern
- We can extend an object’s behavior without creating a hierarchy of new child classes.
- We can add or remove features from an object at runtime which gives developer flexibility not available in simple inheritance.
- We can combine several features by wrapping an object into multiple decorators
- We can divide a complex object into several smaller classes with specific behaviors which promotes the Single Responsibility Principle
- It supports the Open-closed principle which states that the classes should be open for extension but closed for modification.
Cons of Decorator Pattern
- The object instantiation can be complex as we have to create an object by wrapping it in several decorators.
- Sometimes, it’s hard to keep track of the full wrapper stack, and removing a specific wrapper from the stack is not something easy to achieve.
- Decorators can cause issues if the client using them relies heavily on the object concrete type.
Getting Started with Decorator Pattern in ASP.NET Core 5
The decorator pattern can be used to attach cross-cutting concerns such as logging or caching to existing classes without changing their code. Let’s create a new ASP.NET Core 5 MVC Web Application to learn how to use the decorator pattern to dynamically add/remove logging and caching features.
First of all, create the following Player model class in the Models folder of the project.
Player.cs
public class Player
{
    public int Id { get; set; }
    public string Name { get; set; }
}
Next, create the following PlayerService and return a fake list of players. Of course, in a live application, this type of service will fetch data from a backend database but I want to keep the example simple as the purpose of this post is to show you the usage of decorator patterns in real-world scenarios.
IPlayerService.cs
public interface IPlayersService
{
    IEnumerable<Player> GetPlayersList();
}
PlayerService
public class PlayersService : IPlayersService
{
    public IEnumerable<Player> GetPlayersList()
    {
        return new List<Player>()
        {
            new Player(){ Id = 1, Name = "Juan Mata" },
            new Player(){ Id = 2, Name = "Paul Pogba" },
            new Player(){ Id = 3, Name = "Phil Jones" },
            new Player(){ Id = 4, Name = "David de Gea" },
            new Player(){ Id = 5, Name = "Marcus Rashford" }
        };
    }
}
Inject the above PlayerService in an ASP.NET Core MVC Controller and call the GetPlayersList method as shown below.
PlayersController.cs
public class PlayersController : Controller
{
    private readonly IPlayersService _playersService;

    public HomeController(IPlayersService playersService)
    {
        _playersService = playersService;
    }

    public IActionResult Index()
    {
        return View(_playersService.GetPlayersList());
    }
}
Finally, display the list of players on the page using a standard foreach loop.
Index.cshtml
<div class="row">
    <div class="col">
        <h1>Players</h1>
    </div>
</div>

<br/>
<table class="table">
    <thead>
    <tr>
        <th>
            @Html.DisplayNameFor(model => model.Id)
        </th>
        <th>
            @Html.DisplayNameFor(model => model.Name)
        </th>

    </tr>
    </thead>
    <tbody>
    @foreach (var item in Model) {
        <tr>
            <td>
                @Html.DisplayFor(modelItem => item.Id)
            </td>
            <td>
                @Html.DisplayFor(modelItem => item.Name)
            </td>

        </tr>
    }
    </tbody>
</table>
Run the project and you should see the players list on the page.

Everything is pretty straightforward so far as we are using standard services and controllers in ASP.NET Core MVC.
Implementing a Logging Decorator
The first decorator I want to attach with the above PlayerService is a logging decorator. This decorator will allow our service to output the log messages at runtime. This can be very useful in a production environment where you want to see how your services are working internally by logging messages to different sources. Let’s create a class PlayerServiceLoggingDecorator and implement the same IPlayerService interface on it.
PlayersServiceLoggingDecorator.cs
public class PlayersServiceLoggingDecorator : IPlayersService
{
    private readonly IPlayersService _playersService;
    private readonly ILogger<PlayersServiceLoggingDecorator> _logger;

    public PlayersServiceLoggingDecorator(IPlayersService playersService,
        ILogger<PlayersServiceLoggingDecorator> logger)
    {
        _playersService = playersService;
        _logger = logger;
    }

    public IEnumerable<Player> GetPlayersList()
    {
        _logger.LogInformation("Starting to fetch data");

        var stopwatch = Stopwatch.StartNew();

        IEnumerable<Player> players = _playersService.GetPlayersList();

        foreach (var player in players)
        {
            _logger.LogInformation("Player: " + player.Id + ", Name: " + player.Name);
        }

        stopwatch.Stop();

        var elapsedTime = stopwatch.ElapsedMilliseconds;

        _logger.LogInformation($"Finished fetching data in {elapsedTime} milliseconds");

        return players;
    }
}
We are injecting the instances of IPlayerSerice and ILogger in the decorator constructor using the dependency injection. The logging decorator is implementing the IPlayersService interface so it has to define the GetPlayersList method. Inside the GetPlayersList method, we are calling the GetPlayersList method implemented by PlayerService and once we have the players list available, we are simply iterating over them to log their Id and Name. There are also few other LogInformation method calls to log different types of messages. We are also using the Stopwatch object to log our method execution time.
Implementing a Caching Decorator
The second decorator I want to attach is a caching decorator. This decorator will allow our service to cache the player’s list for a certain amount of time so that we don’t need to fetch the data from the backend service or database again. This can be useful in applications where you want to improve your application performance. Let’s create a class PlayersServiceCachingDecorator and implement the same IPlayerService interface on it.
PlayersServiceCachingDecorator.cs
public class PlayersServiceCachingDecorator : IPlayersService
{
    private readonly IPlayersService _playersService;
    private readonly IMemoryCache _memoryCache;

    private const string GET_PLAYERS_LIST_CACHE_KEY = "players.list";

    public PlayersServiceCachingDecorator(IPlayersService playersService, IMemoryCache memoryCache)
    {
        _playersService = playersService;
        _memoryCache = memoryCache;
    }

    public IEnumerable<Player> GetPlayersList()
    {
        IEnumerable<Player> players = null;

        // Look for the cache key.
        if (!_memoryCache.TryGetValue(GET_PLAYERS_LIST_CACHE_KEY, out players))
        {
            // Cache key is not in cache, so fetch players list.
            players = _playersService.GetPlayersList();

            // Set cache options
            var cacheEntryOptions = new MemoryCacheEntryOptions()
                // Keep the players in cache for this time, reset time if accessed.
                .SetSlidingExpiration(TimeSpan.FromMinutes(1));


            // Save players list in cache.
            _memoryCache.Set(GET_PLAYERS_LIST_CACHE_KEY, players, cacheEntryOptions);
        }

        return players;
    }
}
This time, we are injecting the instances of IPlayerSerice and IMemoryCache in the decorator constructor. Inside the GetPlayersList method, we are first checking if the player’s list with a matching cache key is available in the memory cache and returning the same list from the cache. If we don’t have the player’s list in the cache, we are calling the GetPlayersList method of PlayerService class to get the list and then adding it to the memory cache for one minute.
Manually Registering the Decorators with DI Container
We are now ready to register our service and decorators so that they can be injected using the .NET Core dependency injection framework. This is where you will also see how we are wrapping one decorator into another to attach a chain of decorators to an existing service.
Startup.cs
public void ConfigureServices(IServiceCollection services)
{
    services.AddControllersWithViews();

    services.AddScoped<PlayersService>();
    services.AddScoped(serviceProvider =>
    {
        var memoryCache = serviceProvider.GetService<IMemoryCache>();
        var logger = serviceProvider.GetService<ILogger<PlayersServiceLoggingDecorator>>();

        var playerService = serviceProvider.GetRequiredService<PlayersService>();

        IPlayersService cachingDecorator = new PlayersServiceCachingDecorator(playerService, memoryCache);
        IPlayersService loggingDecorator = new PlayersServiceLoggingDecorator(cachingDecorator, logger);

        return loggingDecorator;
    });
}
We first registered the PlayerService using the AddScoped method.
services.AddScoped<PlayersService>();
Then we requested the instance of PlayerService using the GetRequiredService method to pass it into the constructor of our PlayersServiceCachingDecorator class. Finally, the instance of caching decorator is passed in the PlayersServiceLoggingDecorator constructor.
var playerService = serviceProvider.GetRequiredService<PlayersService>();

IPlayersService cachingDecorator = new PlayersServiceCachingDecorator(playerService, memoryCache);
IPlayersService loggingDecorator = new PlayersServiceLoggingDecorator(cachingDecorator, logger);
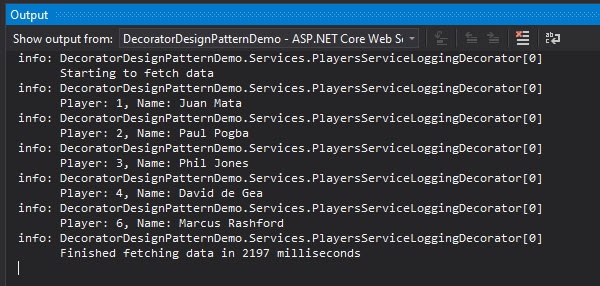
With everything in place, let’s run the application once again and this time check what messages are logged in the output window and how much time our methods took to execute.

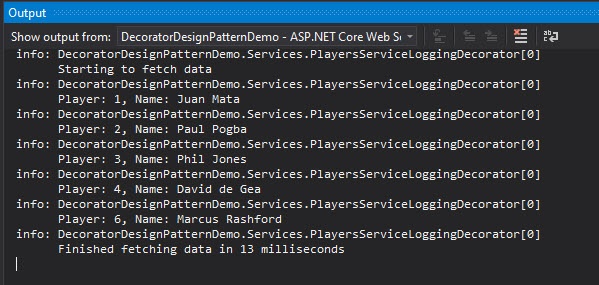
You can see all the log messages in the output window as shown in the above screenshot. The first time, our memory cache was empty that’s why the method took 2197 milliseconds to execute. Refresh the player’s list page again and this time you can see the method is executed in just 13 milliseconds because now the data is fetched from the memory cache.

Registering the Decorators using Scrutor library
We now have a real-world example of using a decorator pattern in an ASP.NET Core application but some of you may not like the way we manually registered our decorators with dependency injection in Startup.cs file. We are instantiating the decorators ourselves and passing them to other decorators by calling their constructors. What if the decorator class has many more services injected into the constructor? You don’t want to instantiate a big list of services just to pass in the decorator constructor. We want an easy way to register our decorators and this is where Scrutor library comes to the rescue.
The Scrutor is a small library that includes some extension methods for registering decorators. The simplest and the most common method is Decorate which allows us to register decorators just like we register normal classes in .NET. We can install the Scrutor library using the NuGet Package Manager.
With the help of the Scrutor library, the registration of our decorators can be as simple as the following code snippet.
Startup.cs
public void ConfigureServices(IServiceCollection services)
{
    services.AddControllersWithViews();

    services.AddScoped<IPlayersService, PlayersService>();

    services.Decorate<IPlayersService, PlayersServiceCachingDecorator>();
    services.Decorate<IPlayersService, PlayersServiceLoggingDecorator>();
}
Dynamically Add or Remove Decorators at Runtime
In a real-world application, you may want to add or remove decorators dynamically at runtime based on different use cases such as:
- You may want to add a logging decorator only in the production environment but don’t want to log anything in the development environment.
- You may want to use some configuration settings to dynamically add/remove decorators in any environment.
ASP.NET Core has a built-in environment variable called ASPNETCORE_ENVIRONMENT to indicate the runtime environment. The value of this variable can be anything as per your need but typically it can be Development, Staging, or Production. To use this variable in Startup.cs file you need to inject IWebHostEnvironment inside the Startup class constructor. The following code snippet shows how to use this variable to dynamically add logging decorator only in the production environment.
Startup.cs
public class Startup
{
    public IConfiguration Configuration { get; }
    private IWebHostEnvironment Environment { get; set; }

    public Startup(IConfiguration configuration, IWebHostEnvironment environment)
    {
        Configuration = configuration;
        Environment = environment;
    }


    public void ConfigureServices(IServiceCollection services)
    {
        services.AddControllersWithViews();

        services.AddScoped<IPlayersService, PlayersService>();
        services.Decorate<IPlayersService, PlayersServiceCachingDecorator>();

        if (Environment.IsProduction())
        {
            services.Decorate<IPlayersService, PlayersServiceLoggingDecorator>();
        }
    }
}
We can also add EnableCaching and EnableLogging settings in the appsettings.json file and caching and logging can be enabled/disabled using these settings.
appsettings.json
{
  "EnableCaching": true,
  "EnableLogging": false,

  "Logging": {
    "LogLevel": {
      "Default": "Information",
      "Microsoft": "Warning",
      "Microsoft.Hosting.Lifetime": "Information"
    }
  },
  "AllowedHosts": "*"
}
Here is the code to register decorators based on above configuration settings.
Startup.cs
services.AddScoped<IPlayersService, PlayersService>();

if (Convert.ToBoolean(Configuration["EnableCaching"]))
{
    services.Decorate<IPlayersService, PlayersServiceCachingDecorator>();
}

if (Convert.ToBoolean(Configuration["EnableLogging"]))
{
    services.Decorate<IPlayersService, PlayersServiceLoggingDecorator>();
}
Summary
The decorator pattern can be used to extend classes or to add cross-cutting concerns without changing their code. In this post, we learned how to use the decorator pattern to add features such as logging and caching in ASP.NET Core web applications. We also learn how to register decorators manually and using the Scrutor library. In the end, we learned how to dynamically enable/disable decorators based on environment or configuration settings. I hope, you will keep the decorator pattern in mind for certain use cases while developing your applications.


Good explanation.