XML is now one of the most common buzzword in software development. Its use is widely spread in almost all the modern technologies including .NET Framework that provides many useful classes to work with XML Documents in System.Xml namespace. XML Documents contain raw data without any formatting or presentation logic and developers use XSLT to transform XML documents into other formats such as HTML. ASP.NET added a new control in version 2.0 called XML control which can be used to transform and display XML documents in ASP.NET pages with ease. In this tutorial I will show you how you use ASP.NET XML Server Control to present XML data.
For this tutorial I have created a sample XML file that store information about London Underground tube stations.
TubeStations.xml
<?xml version="1.0" encoding="UTF-8" standalone="yes"?>
<undergroundList>
  <underground>
    <name>Acton Town</name>
    <lines> District, Piccadilly</lines>
    <postCode>W3 8HN</postCode>
  </underground>
  <underground>
    <name>Baker Street</name>
    <lines> Bakerloo, Circle, Metropolitan, Jubilee</lines>
    <postCode>NW1 5LA</postCode>
  </underground>
  <underground>
    <name>Charing Cross</name>
    <lines> Bakerloo, Northern</lines>
    <postCode>WC2N 5HS</postCode>
  </underground>
  <underground>
    <name>Edgware Road</name>
    <lines> Circle, District, Hammersmith, Bakerloo</lines>
    <postCode>NW1 5BP</postCode>
  </underground>
  <underground>
    <name>Hammersmith</name>
    <lines> District, Piccadilly, Metropolitan, Hammersmith & City</lines>
    <postCode>W6 8AB</postCode>
  </underground>
</undergroundList>
To make this tutorial little more interesting I am creating two XSLT files to transform the same XML file in two different layouts. First XSLT will transform the XML data in list view whereas the second XSLT will present the data in tabular format. Here are the two sample XSLT files I have created for this tutorial.
ListView.xslt
<?xml version="1.0" encoding="utf-8"?>
<xsl:stylesheet version="1.0" xmlns:xsl="http://www.w3.org/1999/XSL/Transform">
  <xsl:output method="html" indent="yes"/>
  <xsl:template match="/undergroundList">
    <div style="font-family:Verdana; font-size:8pt;">
    <h3>London Underground Tube Stations</h3>
    <xsl:for-each select="underground">
      <span style="color:blue; font-weight:bold;font-size:10pt;">
        <xsl:value-of select="name"/>
      </span>
      <br />
      <b>Post Code:  </b> <xsl:value-of select="postCode"/>
      <br />
      <b>Lines: </b> <xsl:value-of select="lines"/>
      <hr />
    </xsl:for-each>
    </div>
  </xsl:template>
</xsl:stylesheet>
TableView.xslt
<?xml version="1.0" encoding="utf-8"?>
<xsl:stylesheet version="1.0" xmlns:xsl="http://www.w3.org/1999/XSL/Transform">
  <xsl:output method="html" indent="yes"/>
  <xsl:template match="/undergroundList">
    <div style="font-family:Verdana; font-size:9pt;">
      <h3>London Underground Tube Stations</h3>
      <table style="width:100%; border: solid 1px #336699;" cellspacing="0" cellpadding="5" border="1">
        <tr style="background-color:#336699; color:white; font-weight:bold;">
          <td>Station Name</td>
          <td>Post Code</td>
          <td>Lines</td>
        </tr>
        <xsl:for-each select="underground">
          <tr>
            <td>
              <xsl:value-of select="name"/>
            </td>
            <td>
              <xsl:value-of select="postCode"/>
            </td>
            <td>
              <xsl:value-of select="lines"/>
            </td>
          </tr>
        </xsl:for-each>
      </table>
    </div>
  </xsl:template>
</xsl:stylesheet>
Once you have both XML and XSLT files ready you are ready to use ASP.NET XML Control. Create a new web form in ASP.NET and add two XML controls from the Toolbox. XML control is very easy control to use because it does not have hundreds of properties to work with. It has property DocumentSource which will ask you the path of your XML Document and TransformSource that need your XSLT file path. Following Code shows you both XML controls I added in my page for this tutorial.
<asp:Xml ID="Xml1" runat="server" DocumentSource="~/TubeStations.xml"
   TransformSource="~/ListView.xslt" />

<asp:Xml ID="Xml2" runat="server" DocumentSource="~/TubeStations.xml"
   TransformSource="~/TableView.xslt" />
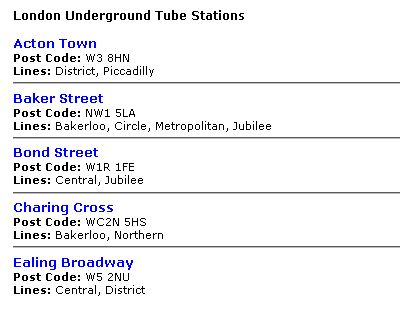
The Following figure is the output of first XML control in which data is transformed using ListView.xslt.

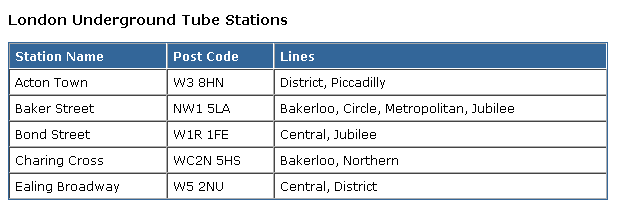
The Following figure is the output of second XML control that transformed XML using TableView.xslt.


i have used this article and it work very smoothly, Thank you.
Better Dose for me on xslt…