In modern web applications, it is very common to call third-party Web APIs to enhance the functionality of the application. There are thousands of free and commercial APIs available and if you know how to consume those APIs in your ASP.NET Core Applications, you can build very powerful business applications. In my previous post A Developer’s Guide for Creating Web APIs with ASP.NET Core 5, I covered ASP.NET Core Web APIs in detail. In this post, I will explain how you can consume third-party Web APIs in ASP.NET Core applications.
Table of Contents
Overview of Third Party API
We will develop an application that will allow the user to input a country code and a year and then we will call a third party API to fetch the list of public holidays of that particular country in that particular year. The third-party API we will consume is called Nager.Date which is a worldwide public holidays API.

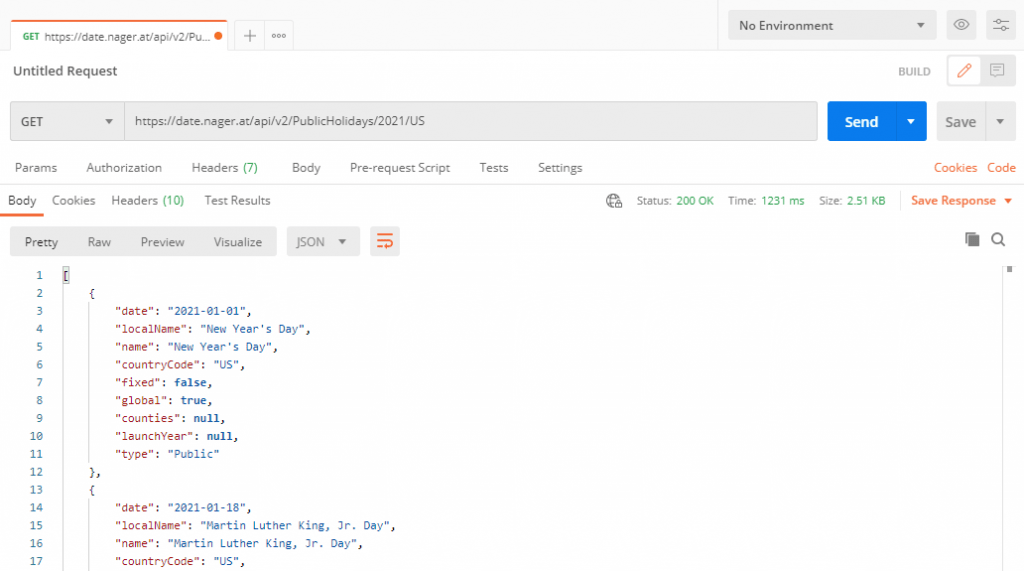
It is a very simple API and you can easily test this API in Postman by entering the following URL.
https://date.nager.at/api/v2/PublicHolidays/2020/US
The response of this API is the list of public holidays in JSON format as shown below:

Understanding HttpClient Object
The most common and well knows class that allows us to consume third-party APIs in ASP.NET Core application is HttpClient class. This class gives us the ability to send HTTP requests to third-party APIs and receive HTTP responses returned from those APIs. Every instance of HttpClient maintains its own connection pool that allows it to isolate its requests from requests executed by other instances of HttpClient. This class also acts as a base class for more specific HTTP clients. For example, you can create FacebookHttpClient or TwitterHttpClient as child classes of base HttpClient and can communicate with Facebook and Twitter APIs using these specific HTTP clients.
It is recommended to create one instance of HttpClient and reuse it throughout the application lifetime. This is because instantiating a new instance of HttpClient for every request can easily exhaust the number of sockets available under heavy loads. This is mainly because when the HttpClient object is disposed of the underlying socket is not immediately released. You can read this wonderful blog post You’re using HttpClient wrong and it’s destabilizing your software to get more information about the problem I just mentioned.
Using HttpClient in ASP.NET Core
As I mentioned above that we will create an application that will allow the user to view the list of public holidays in any country. Let’s create an ASP.NET Core MVC Web Application and create the following interface. This interface has just one method GetHolidays which has two parameters countryCode and year which we will receive from the user shortly.
public interface IHolidaysApiService
{
    Task<List<HolidayModel>> GetHolidays(string countryCode, int year);
}
The GetHolidays method above is returning a list of HolidayModel which is a model class that has the properties mapped with the response of Nager.Date API.
public class HolidayModel
{
    public string Name { get; set; }
    public string LocalName { get; set; }
    public DateTime? Date { get; set; }
    public string CountryCode { get; set; }
    public bool Global { get; set; }
}
Next, we need to implement a HolidaysApiService class that will implement the IHolidaysApiService declared above. Note how I have declared a private and static HttpClient variable in the class and how it is defined in the static constructor of the class. It is the recommended way of creating HttpClient instances as mentioned on Microsoft official docs.
public class HolidaysApiService : IHolidaysApiService
{
    private static readonly HttpClient client;

    static HolidaysApiService()
    {
        client = new HttpClient()
        {
            BaseAddress = new Uri("https://date.nager.at")
        };
    }
}
Next we need to define GetHolidays method as shown below:
public async Task<List<HolidayModel>> GetHolidays(string countryCode, int year)
{
    var url = string.Format("/api/v2/PublicHolidays/{0}/{1}", year, countryCode);
    var result = new List<HolidayModel>();
    var response = await client.GetAsync(url);
    if (response.IsSuccessStatusCode)
    {
        var stringResponse = await response.Content.ReadAsStringAsync();

        result = JsonSerializer.Deserialize<List<HolidayModel>>(stringResponse,
            new JsonSerializerOptions() { PropertyNamingPolicy = JsonNamingPolicy.CamelCase });
    }
    else
    {
        throw new HttpRequestException(response.ReasonPhrase);
    }

    return result;
}
A lot is happening in the above method so let me explain it all in detail:
- The first line is building the Url of Nager.Date API and using the year and countryCode parameters
var url = string.Format("/api/v2/PublicHolidays/{0}/{1}", year, countryCode);
- Next, we are making an API call using the GetAsync method that sends a GET request to the specified Uri as an asynchronous operation. The method returns System.Net.Http.HttpResponseMessage object that represents an HTTP response message including the status code and data.
var response = await client.GetAsync(url);
- Next, we are calling ReadAsStringAsync method that serializes the HTTP content to a string
var stringResponse = await response.Content.ReadAsStringAsync();
- Finally, we are using JsonSerializer to Deserialize the JSON response string into a List of HolidayModel objects.
result = JsonSerializer.Deserialize<List<HolidayModel>>(stringResponse,
    new JsonSerializerOptions() { PropertyNamingPolicy = JsonNamingPolicy.CamelCase });
That’s all we need to consume a third part Public Holidays API. To use our HolidaysApiService, we need to first register our service in Startup.cs class.
public void ConfigureServices(IServiceCollection services)
{
    services.AddControllersWithViews();
    services.AddSingleton<IHolidaysApiService, HolidaysApiService>();
}
Next, we can inject our HolidaysApiService in our HomeController and call the GetHolidays method by passing the countryCode and year parameter we will receive inside the Index action method.
public class HomeController : Controller
{
    private readonly IHolidaysApiService _holidaysApiService;

    public HomeController(IHolidaysApiService holidaysApiService)
    {
        _holidaysApiService = holidaysApiService;
    }

    public async Task<IActionResult> Index(string countryCode, int year)
    {
        List<HolidayModel> holidays = new List<HolidayModel>();
        holidays = await _holidaysApiService.GetHolidays(countryCode, year);

        return View(holidays);
    }
}
Finally, we need a Razor View to create a form where the user will input country code and year. The form will be submitted to the above Index action which will then call the GetHolidays method. Here is the code of Index.cshtml Razor view showing an HTML form and a table to display the public holidays.
@model List<HolidayModel>
@{
    ViewData["Title"] = "Home Page";
}

<div>
    <h3 class="display-4">Public Holidays Finder</h3>
    <center>
        <form asp-controller="Home" asp-action="Index">
            <table>
                <tr>
                    <td>Country Code: </td>
                    <td><input type="text" id="txtCountryCode" name="CountryCode" /></td>
                    <td>Year: </td>
                    <td><input type="text" id="txtYear" name="Year" /></td>
                    <td><input type="submit" value="Submit" /></td>
                </tr>
            </table>
            <hr />
        </form>
    </center>
    @if (Model != null && Model.Count > 0)
    {
        <table class="table table-bordered table-striped table-sm">
            <thead>
            <tr>
                <th>Date</th>
                <th>Name</th>
                <th>Local Name</th>
                <th>Country Code</th>
                <th>Global</th>
            </tr>
            </thead>
            <tbody>
            @foreach (var item in Model)
            {
                <tr>
                    <td>@item.Date.Value.ToShortDateString()</td>
                    <td>@Html.DisplayFor(modelItem => item.Name)</td>
                    <td>@Html.DisplayFor(modelItem => item.LocalName)</td>
                    <td>@Html.DisplayFor(modelItem => item.CountryCode)</td>
                    <td>@Html.DisplayFor(modelItem => item.Global)</td>
                </tr>
            }
            </tbody>
        </table>
    }

</div>
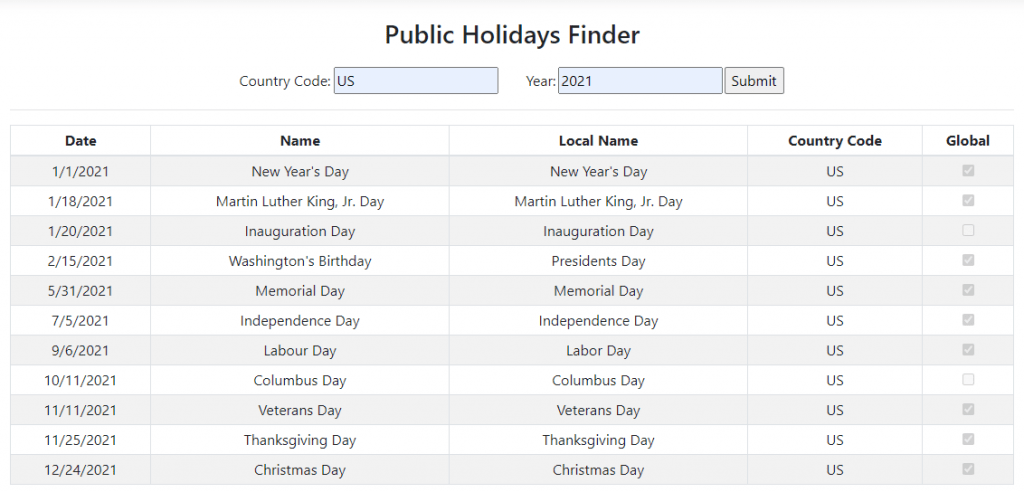
It is now time to test our application and see if we will be able to consume the third Party API. Press F5 in Visual Studio and you will see a page similar to the following. You can input a country code e.g. US, DE, etc., and a year e.g. 2021, and click the “Submit” button and if everything goes well you will see our code calling a third-party API, fetching a list of Public Holidays from the API and displaying it on the page.

Managing HttpClient objects with IHttpClientFactory
To make HttpClient instances manageable, and to avoid the socket exhaustion issue mentioned above, .NET Core 2.1 introduced the IHttpClientFactory interface which can be used to configure and create HttpClient instances in an app through Dependency Injection (DI). To make use of IHttpClientFactory, we can register it in Startup.cs file by calling AddHttpClient(IServiceCollection).
public void ConfigureServices(IServiceCollection services)
{
    services.AddControllersWithViews();

    services.AddSingleton<IHolidaysApiService, HolidaysApiService>();

    services.AddHttpClient("PublicHolidaysApi", c => c.BaseAddress = new Uri("https://date.nager.at"));
}
It is possible to register multiple HTTP clients with different names using the AddHttpClient method. The first parameter of the AddHttpClient method is the name of the client and the second parameter is the Lamba expression that will configure the HttpClient. In the above example, I am setting the BaseAddress property with the Url of the third-party API I want to call using this particular HTTP client.
Once the HTTP Client is registered, we can inject IHttpClientFactory in our controllers and services and call its CreateClient method to create a specific HTTP Client object we want to use in our code. The CreateClient method needs the name of the HTTP Client you want to create as shown below:
public class HolidaysApiService : IHolidaysApiService
{
    private readonly HttpClient client;

    public HolidaysApiService(IHttpClientFactory clientFactory)
    {
        client = clientFactory.CreateClient("PublicHolidaysApi");
    }

    public async Task<List<HolidayModel>> GetHolidays(string countryCode, int year)
    {
        var url = string.Format("/api/v2/PublicHolidays/{0}/{1}", year, countryCode);
        var result = new List<HolidayModel>();
        var response = await client.GetAsync(url);
        if (response.IsSuccessStatusCode)
        {
            var stringResponse = await response.Content.ReadAsStringAsync();

            result = JsonSerializer.Deserialize<List<HolidayModel>>(stringResponse,
                new JsonSerializerOptions() { PropertyNamingPolicy = JsonNamingPolicy.CamelCase });
        }
        else
        {
            throw new HttpRequestException(response.ReasonPhrase);
        }

        return result;
    }
}
Summary
In this article, I have given you an overview of HttpClient and also gave you examples of creating HttpClient objects directly or using IHttpClientFactory. I also showed you an example of invoking a third part Web API using HttpClient. I hope you are now familiar with the HttpClient object and its usage and will start using it in your projects with confidence.


Excellent tutorial. It was very helpul. Thanks.
Hey there,
I would like to point out that the preferred way to implement 3rd party services that relies on HttpClient, starting from .NET Core 2.1, is now based on IHttpClientFactory.
It helps create strongly typed services and manage HttpClient more efficiently (and to not having to take care of is lifecycle).
More infos here : https://docs.microsoft.com/en-us/dotnet/architecture/microservices/implement-resilient-applications/use-httpclientfactory-to-implement-resilient-http-requests
Thanks for the article by the way!
Really good work, comfortable and easy understanding
Can you post a example with post and put?
Thanks.
Very nice article. Is it also possible to download the code?
Yes, you can download the source code related to this blog post from the following link.
https://github.com/ezzylearning/ConsumeThirdPartyApisDemo
Beautifully done.
Thank you.
What if for instance i have three/four different api addresses with having different timeout/header e.t.c setting. does shared HttpClient is a good approach in that case. I might have parallel calls going on on different api’s
As I mentioned in the tutorial, you can add as many HttpClient objects as you want using services.AddHttpClient and each one of these HttpClient objects can have their own BaseAddress, Timeout etc.
Starting from .NET 2.1 you can now create multiples strongly typed services that relies on IHttpClientFactory, with their owns properties, settings, etc..