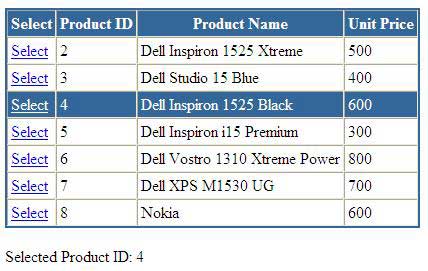
The new ListView control introduced in ASP.NET 3.5 allows you to display, select, edit, update, delete, sort and paginate your data in extremely flexible way. In one of my other tutorial I have shown you how you can use ListView control to display data. This tutorial covers how to provide selection feature in ListView control. I will introduce you SelectedItemTemplate of ListView control which you can use to render the contents of the selected item.

To start this tutorial you need to drag a ListView control on a Page and you need to add LayoutTemplate, ItemTemplate and SelectedItemTemplate as shown in the following code. Notice that the HTML markup in SelectedItemTemplate is almost identical to ItemTemplate with only one difference that I am changing the background and text color of the row in SelectedItemTemplate to give user visual clue that the item is selected. Also notice the LinkButton I am using in both templates. The CommandName of these buttons is set to Select which is required to enable selections in ListView.
<asp:ListView ID="ListView1" runat="server" DataKeyNames="ProductID"
   OnSelectedIndexChanging="ListView1_SelectedIndexChanging">

   <LayoutTemplate>
      <table style="border: solid 2px #336699;" cellspacing="0" cellpadding="3" rules="all">
         <tr style="background-color: #336699; color: White;">
            <th>Select</th>
            <th>Product ID</th>
            <th>Product Name</th>
            <th>Unit Price</th>
         </tr>
         <tbody>
            <asp:PlaceHolder ID="itemPlaceHolder" runat="server" />
         </tbody>
      </table>
   </LayoutTemplate>

   <ItemTemplate>
      <tr>
         <td>
            <asp:LinkButton ID="lnkSelect" Text="Select" CommandName="Select" runat="server" />
         </td>
         <td><%# Eval("ProductID")%></td>
         <td><%# Eval("ProductName")%></td>
         <td><%# Eval("UnitPrice")%></td>
      </tr>
   </ItemTemplate>
   <SelectedItemTemplate>
      <tr style="background-color: #336699; color: White;">
         <td>
            <asp:LinkButton ID="lnkSelect" Text="Select" CommandName="Select" runat="server"
               ForeColor="White" />
         </td>
         <td><%# Eval("ProductID")%></td>
         <td><%# Eval("ProductName")%></td>
         <td><%# Eval("UnitPrice")%></td>
      </tr>
   </SelectedItemTemplate>
</asp:ListView>

<br />
<asp:Label ID="Label1" runat="server" Text="Label"></asp:Label>
The following code binds data with ListView control in the Page_Load event and then shows you how you can handle SelectedIndexChanging event to handle selections and get primary key value associated with the selected item. The SelectedIndexChanging event fires every time user click the button which has CommandName property set to Select as shown in the ListView source code above.
protected void Page_Load(object sender, EventArgs e)
{
   if (!Page.IsPostBack)
   {
      BindData();
   }
}

private void BindData()
{
   string constr = "Data Source=TestServer;Database=SampleDB;uid=test; pwd=test;";
   string query = "SELECT ProductID, ProductName, UnitPrice FROM Products";

   SqlDataAdapter da = new SqlDataAdapter(query, constr);
   DataTable table = new DataTable();

   da.Fill(table);

   ListView1.DataSource = table;
   ListView1.DataBind();
}

protected void ListView1_SelectedIndexChanging(object sender, ListViewSelectEventArgs e)
{
   ListView1.SelectedIndex = e.NewSelectedIndex;

   string pid = ListView1.SelectedDataKey.Value.ToString();

   //string pid = ListView1.DataKeys[e.NewSelectedIndex].Value.ToString();

   Label1.Text = "Selected Product ID: " + pid ;

   BindData();
}
In SelectedIndexChanging event handler I am getting the Primary Key value of the item user has selected by using the SelectedDataKey property of ListView control. You can also use DataKeys collection and can pass the selected row index no by using NewSelectedIndex property of ListViewSelectEventArgs class. Keep in mind that both of these techniques will only work if you have set DataKeyNames property of ListView control the primary key field of your data as shown above in the ListView control source code.


Very nice post thanks for shearing
thx… you just saved me!
sir,
Your tutorial is good but you also explain me paging and sorting in listview .
sir,
Your tutorial is good but you also explain me paging and sorting in listview .
This is a very nice and helpful tutorial. I am very satisfied with this tutorials.
A wonderful tutorial for listview control…got to know about Listviw in depth…
How to reterive image from listview control in Asp.net
Its very nice code to refer 🙂
The SelectedIndexChanging event not firing when I click select in button :S
sir plg sent me how can i post back dta
send more tips