In my first tutorial on ASP.NET AJAJX ModelPopupExtender control I have shown you how you can display model dialog boxes in ASP.NET with client side JavaScript behavior. In this tutorial, I will show you how you can use ModelPopupExtender control with server side post backs so that when user performs any action in the dialog box such as button click you can execute code in code behind file on the server.

Create a new web site in Visual Studio and open the page in which you want to use ModelPopupExtender control. The first thing you need to add is a CSS class which I will attach with ModelPopupExtender control to make page background transparent and darker when the ModelPopupExtender control will appear on screen. So add this CSS in your page header tag.
<style type="text/css">
   .BackgroundStyle
   {
      background-color: #f3f3f3;
      filter: alpha(opacity=50);
      opacity: 0.5;
   }
</style>
Next, we are moving to our page and you need to add ScriptManager control first which is required to use any ASP.NET AJAX related feature on the page.
<asp:ScriptManager ID="ScriptManager1" runat="server" />
Next you need to add ASP.NET AJAX UpdatePanel control on the page. This control is required to perform AJAX based asynchronous post backs so that when user click submit button inside model dialog box the whole page does not need to be reloaded.
<asp:UpdatePanel ID="UpdatePanel1" runat="server">
   <ContentTemplate>
     …
   </ContentTemplate>
</asp:UpdatePanel>
Next add a button and a label control inside the ContentTemplate of the UpdatePanel. The button will ask user to participate in a quick poll which will be shown in model dialog box and when user will submit the poll by clicking the submit button inside model dialog I will show the results on the label control.
<asp:Button ID="Button1" runat="server" Text="Quick Poll" />
<br />
<asp:Label ID="Label1" runat="server"></asp:Label>
Next you need to add a Panel control inside the ContentTemplate of the UpdatePanel which will be used as a popup window by the ModelPopupExtender control.
<asp:Panel ID="Panel1" runat="server" BackColor="#ffffff"
   BorderColor="#dadada" BorderStyle="Solid" BorderWidth="4px"
   Height="190px" Width="350px" Font-Names="Arial" Font-Size="10pt">

   <table cellpadding="10" cellspacing="0" style="width: 100%">
      <tr>
         <td>
            What is your Favorite Programming Language?
         </td>
      </tr>
      <tr>
         <td>
            <asp:RadioButtonList ID="RadioButtonList1" runat="server">
               <asp:ListItem>Java</asp:ListItem>
               <asp:ListItem>VB.NET</asp:ListItem>
               <asp:ListItem>C#</asp:ListItem>
            </asp:RadioButtonList>
         </td>
      </tr>
      <tr>
         <td>
            <asp:Button ID="Button2" runat="server" Text="Submit"
               OnClick="Button2_Click" />
            <asp:Button ID="Button3" runat="server" Text="Cancel" />
         </td>
      </tr>
   </table>

</asp:Panel>
The above markup inside Panel control is very straight forward. It has a RadioButtonList control and two buttons arranged inside the html table for better layout. Notice that the submit button has OnClick event handler attached with it which will be defined in code behind file of the page.
Finally, you need to add the ASP.NET AJAX ModelPopupExtender control inside the ContentTemplate of the UpdatePanel control as follows:
<ajax:ModalPopupExtender ID="ModalPopupExtender1" runat="server"
   PopupControlID="Panel1"
   DropShadow="True"
   TargetControlID="Button1"
   CancelControlID="Button3"
   BackgroundCssClass="BackgroundStyle" />
The following section explains all the ModelPopupExtender properties in detail:
TargetControlID: This property needs the id of the target control that will activate the model popup dialog box. I have given the id of the first button control “Button1”.
PopupControlID: This property needs the id of the control you want to use as a popup window. I have given the reference of the Panel control which ModelPopupExtender will display on screen.
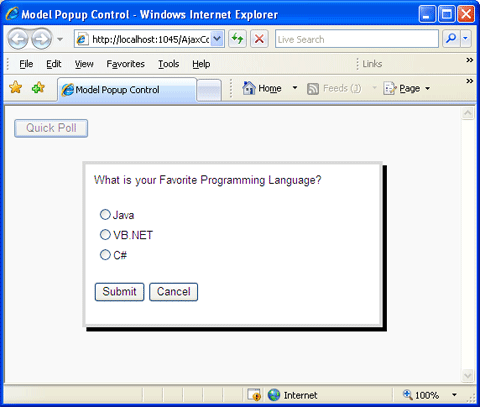
DropShadow: A Boolean property to add drop shadow to the popup window. I set it to true and you can see a black shadow with popup window in the figure above.
OkControlID: This property needs the id of the control which will dismiss the model popup dialog box. I am not using this property in this tutorial because I want to handle submit button click event on the server side.
CancelControlID: This property needs the id of the control that will cancel or dismiss the popup dialog box.
OnOkScript: This property needs the name of the JavaScript function that will be called automatically when the modal popup is dismissed with the OkControlID. You don’t need to set this property if you want to handle submit button click in the server side code with a post back.
OnCancelScript: This property needs the name of the JavaScript function that will be called automatically when modal popup is dismissed with the CancelControlID. In the example above I haven’t used this property because I don’t want to run any script on Cancel button click.
BackgroundCssClass: This property needs the name of the CSS class to apply to the page background when the modal popup is displayed. I have given the name of the CSS class we defined in the start.
PopupDragHandleControlID: This property needs the ID of the control which will be used to drag the popup dialog box on screen. Normally, this control is available at the top of the popup window and acts as a title bar for dragging operation. I have not used this property in this tutorial but you can provide dragging feature by setting this property in your applications.
X: This property can be used to position the model dialog box on screen horizontally by setting the X coordinate of the top/left corner of the modal popup. If you will skip this property the model dialog box will appear centered horizontally.
Y: This property can be used to position the model dialog box on screen vertically by setting the Y coordinate of the top/left corner of the modal popup. If you will skip this property the model dialog box will appear centered vertically.
RepositionMode: This property determines whether the popup needs to be repositioned when the window is resized or the page is scrolled by the user.
In the end, add the following code in the page code behind file to handle Submit button click event. That’s it, Test your page in the browser and you will see the model dialog box similar to the above figure. Select any language option from the model dialog box and click submit button. You will notice the label on the page updated with your selected language without a full post back.
protected void Button2_Click(object sender, EventArgs e)
{
   Label1.Text = RadioButtonList1.SelectedItem.Text;
}


I want to perform some processing on Button1 click control and then show the popup from server side. How can this be done.
thanks a lot for this article,
it was helpful 😀