JQuery DataTables plugin is one of the most powerful plugin for creating tabular listings of your data and adding user interactions to it. It has built in support for searching, sorting and pagination without any configuration. It also has some advanced features such as support for AJAX, server side processing and styling the grid according to some of the popular frameworks e.g. Bootstrap, Material Design etc. As a seasoned .NET professional, I always wanted to connect DataTables with some backend data source using ASP.NET Web API so that I can not only take advantage of the .NET platform on the server side but also use DataTables for my front end needs such as dashboards or advance user interfaces. In this tutorial I will go through the basics of DataTables and will show you how you can use JQuery DataTables with ASP.NET Web API. In my next tutorial JQuery DataTables Paging, Sorting and Searching with ASP.NET Web API, I will show you how you can enable searching, sorting and paging features of the plugin and use ASP.NET Web API to support these features.
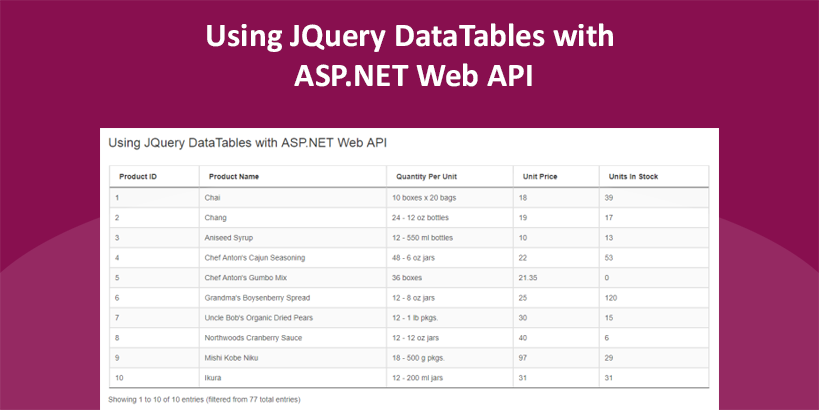
Table of Contents
Creating ASP.NET Web Application Project
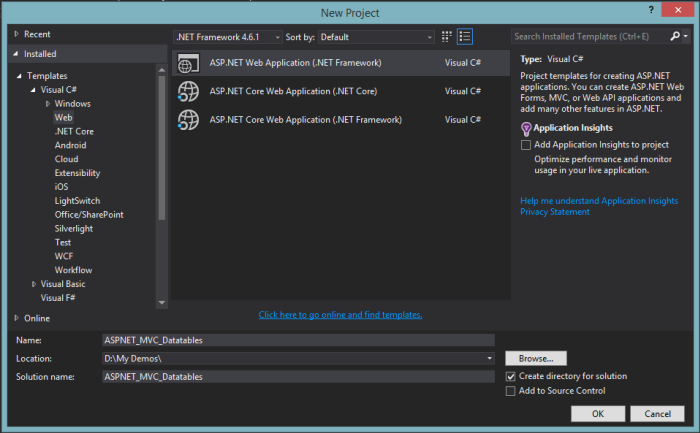
Let’s start by creating a new ASP.NET Web Application project in Visual Studio 2015 using File > New > Project menu option. In the new project dialog box, give your project some name e.g. ASPNET_MVC_Datatables.
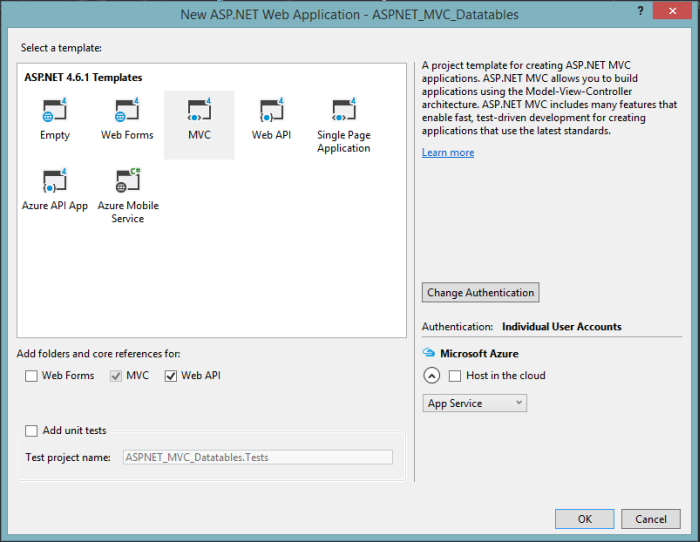
When Visual Studio ask you to select a template for the project, select MVC template and make sure to add folders and core references for MVC and Web API as shown in the screenshot below. Visual Studio will create MVC web application project with some default folders and pages.
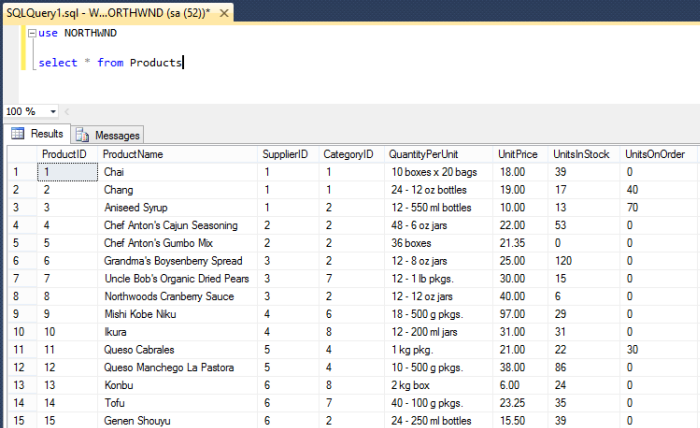
To display real data on the page, I have decided to use Microsoft popular database Northwind for this tutorial. I will use following Products table from Northwind database in this tutorial. I will use Entity Framework and I will show you how to create a basic repository class to connect and load data from the database table. Please keep in mind that the purpose of this article is to show you how you can use JQuery DataTables plugin with ASP.NET Web API so I will not spend too much time on application architecture, design patterns, separation of concern etc.
Creating Entity Framework Data Context and Product Repository
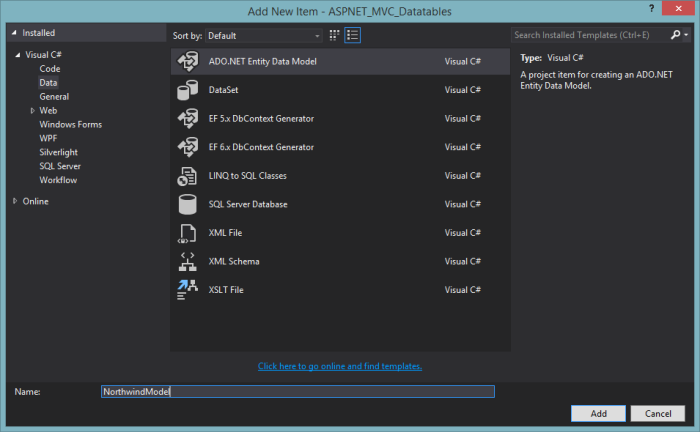
Create a folder name Data in the project and add a new item in the folder using Right Click > Add > New menu option. Choose ADO.NET Entity Data Model as template and give the file some name e.g. NorthwindModel.
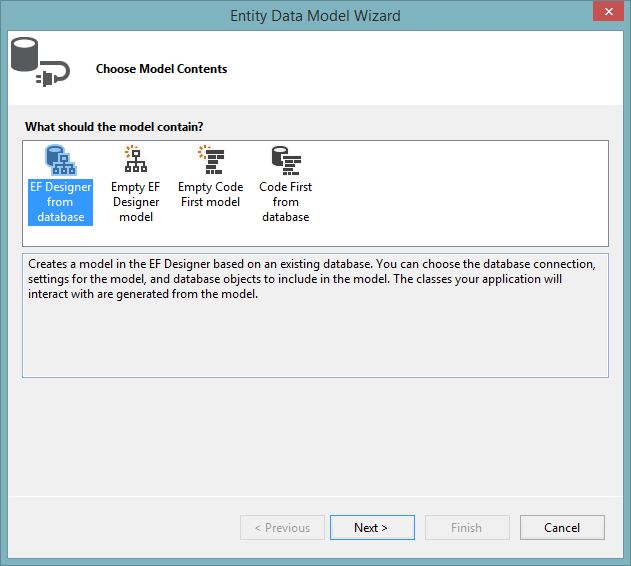
When you will click Add button, Visual Studio will open Entity Data Model Wizard. Select EF Designer from database and click Next button.
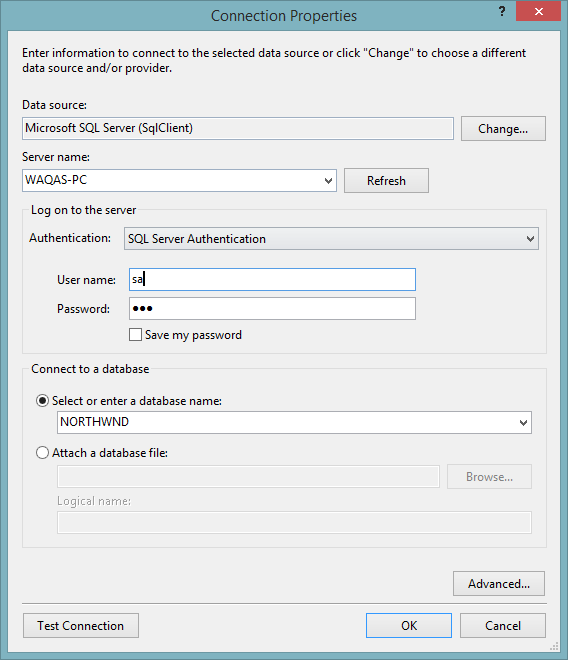
Visual Studio will ask you to create a connection with the database. Provide database server name, user name and password and choose database name e.g. NORTHWIND. I am providing these details according to my database server and environment please make sure you provide these details according to your development environment. You can also click Test Connection button to verify if you can successfully connect to the database.
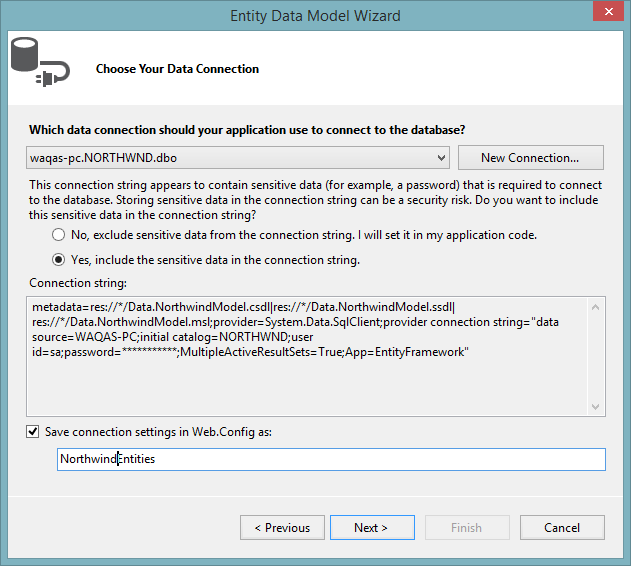
Once you will click OK, Visual Studio will give you option to save connection string information in web.config file available at the root folder of your project. You can also give name to your connection string setting in web.config file e.g. NorthwindEntities.
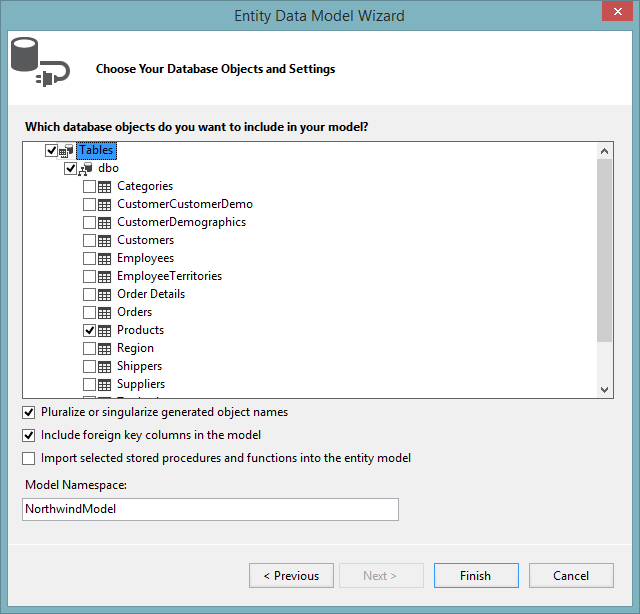
Click the Next button and you will be asked to choose database objects such as Tables, Stored procedures etc. Expand Tables node and choose Products table as shown in the screenshot below.
Click the Finish button and Visual Studio will create NorthwindEntities.edmx file in the Data folder. You will see the Products table added automatically in the diagram.
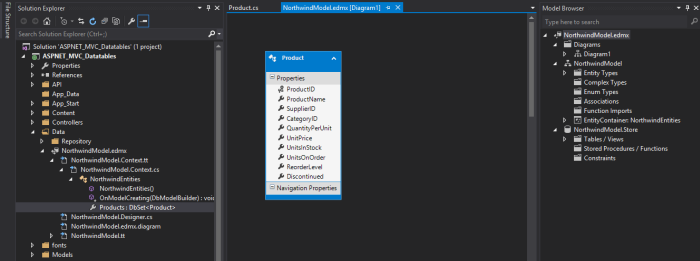
Visual Studio will also generate NorthwindEntities class inherited from Entity Framework DbContext class. Notice the Products property of type DbSet<Product> also generated for you automatically by the Entity Framework. This class can be used to query data from Products table in the database.
namespace ASPNET_MVC_Datatables.Data
{
    using System;
    using System.Data.Entity;
    using System.Data.Entity.Infrastructure;

    public partial class NorthwindEntities : DbContext
    {
        public NorthwindEntities()
            : base("name=NorthwindEntities")
        {
        }

        protected override void OnModelCreating(DbModelBuilder modelBuilder)
        {
            throw new UnintentionalCodeFirstException();
        }

        public virtual DbSet<Product> Products { get; set; }
    }
}
Product entity class is also generated with all the Products table columns available as class properties.
namespace ASPNET_MVC_Datatables.Data
{
    using System;
    using System.Collections.Generic;

    public partial class Product
    {
        public int ProductID { get; set; }
        public string ProductName { get; set; }
        public Nullable<int> SupplierID { get; set; }
        public Nullable<int> CategoryID { get; set; }
        public string QuantityPerUnit { get; set; }
        public Nullable<decimal> UnitPrice { get; set; }
        public Nullable<short> UnitsInStock { get; set; }
        public Nullable<short> UnitsOnOrder { get; set; }
        public Nullable<short> ReorderLevel { get; set; }
        public bool Discontinued { get; set; }
    }
}
Next, I will be creating a ProductRepository class that can act as a Data Layer for my project. ProductRepository class can have methods such as GetProducts, UpdateProduct, DeleteProduct etc. and can use above auto generated classes with LINQ queries. Create a folder name Repository in Data folder and add following interface and class in it.
namespace ASPNET_MVC_Datatables.Data.Repository
{
    public interface IProductRepository
    {
        IQueryable<Product> GetProducts();
    }
}
namespace ASPNET_MVC_Datatables.Data.Repository
{
    public class ProductRepository : IProductRepository
    {
        private NorthwindEntities context;

        public ProductRepository(NorthwindEntities context)
        {
            this.context = context;
        }

        public IQueryable<Product> GetProducts()
        {
            return context.Products;
        }
    }
}
Creating ASP.NET Web API Controller
Create a folder name API in the project root directory, Right Click on API folder and choose New > Controller menu option. Visual Studio will open following dialog box where you can select the type of controller you want to add. Choose Web API 2 Controller – Empty template and click Add button.
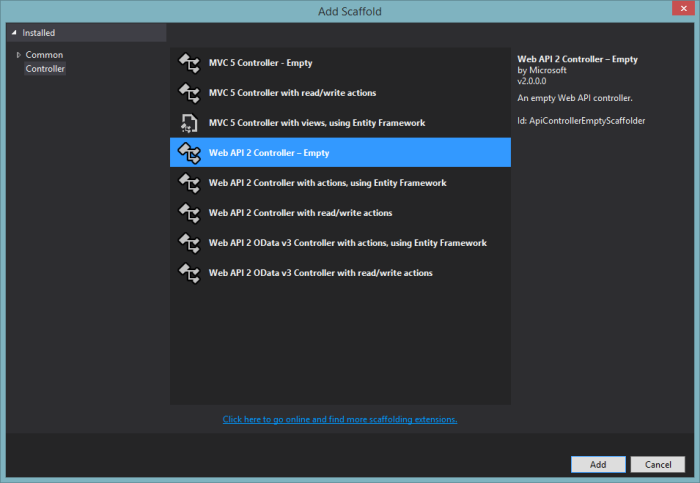
Next you will be asked to give your controller some name. Type ProductsController in the controller name field and click Add button.

Add the following code in ProductController class. The code is pretty straight forward. It is initializing the ProductRepository instance in the constructor of the controller. It is also implementing GetProducts method that returns a list of Product objects. The method GetProducts can be queried using HTTP GET method.
public class ProductsController : ApiController
{
        private IProductRepository productRepository;

        public ProductsController()
        {
            this.productRepository = new ProductRepository(new NorthwindEntities());
        }

        [HttpGet]
        [Route("api/Products")]
        public List<Product> GetProducts()
        {
            return productRepository.GetProducts().ToList();
        }
}
You can open browser and can query the GetProducts method directly. You will see the list of projects returned in JSON format as shown below.
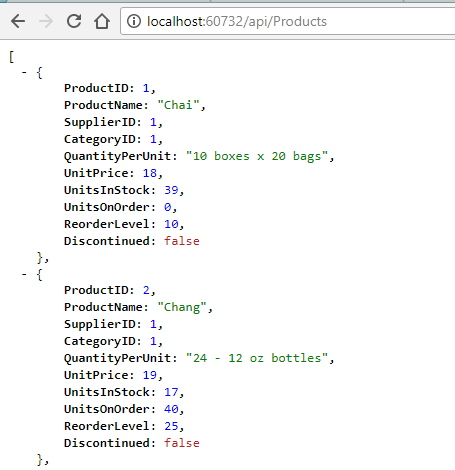
If you get response in XML format instead of JSON format then make sure you have following two lines added in the Application_Start method declared in Global.asax.cs file available in the root folder of your project.
GlobalConfiguration.Configuration.Formatters.JsonFormatter.SerializerSettings.ReferenceLoopHandling = Newtonsoft.Json.ReferenceLoopHandling.Ignore;

GlobalConfiguration.Configuration.Formatters.Remove(GlobalConfiguration.Configuration.Formatters.XmlFormatter);
The complete Global.asax.cs file should look like following code:
namespace ASPNET_MVC_Datatables
{
    public class MvcApplication: System.Web.HttpApplication
    {
        protected void Application_Start()
        {            GlobalConfiguration.Configuration.Formatters.JsonFormatter.SerializerSettings.ReferenceLoopHandling = Newtonsoft.Json.ReferenceLoopHandling.Ignore;
            GlobalConfiguration.Configuration.Formatters.Remove(GlobalConfiguration.Configuration.Formatters.XmlFormatter);

            AreaRegistration.RegisterAllAreas();
            GlobalConfiguration.Configure(WebApiConfig.Register);
            FilterConfig.RegisterGlobalFilters(GlobalFilters.Filters);
            RouteConfig.RegisterRoutes(RouteTable.Routes);
            BundleConfig.RegisterBundles(BundleTable.Bundles);
        }
    }
}
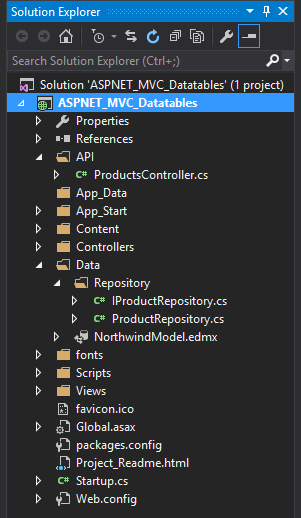
Solution explorer should look like the following screenshot after above classes and Web API controller added to the project.
Setting up DataTables
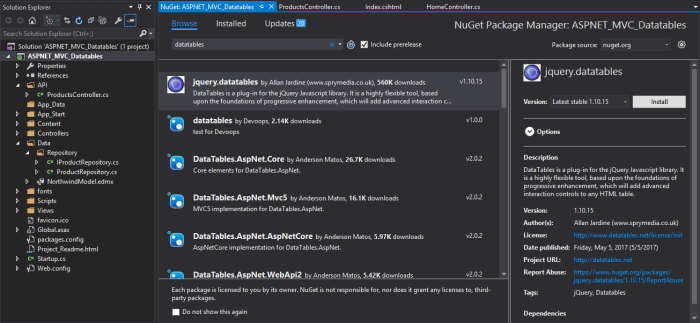
It is time to obtain the JQuery DataTables plugin and add it into the project. The latest version of the plugin is 1.10.15 and it can be downloaded from the DataTables website. It can also be added in the project using NuGet package manager. If you don’t want to download the files, you can also make use of the CDN files available on the download page. As it is a JQuery plugin you should include the JQuery library too, preferably the latest version. Luckily, Visual Studio automatically adds JQuery files in every new ASP.NET web application project we create and they are available in Scripts folder in the project root directory. I have decided to include DataTables plugin using NuGet package manager so Right Click the project name in solution explorer and choose Manage NuGet Packages menu option. Type datatables in the search field and wait for few seconds. You will see jquery.datatables item appeared in the search results. Select the item and click Install button.
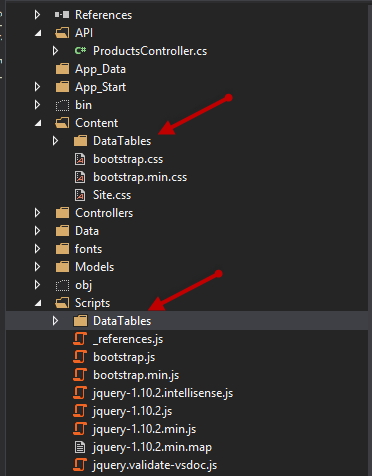
Notice the DataTables folders added automatically in Scripts and Content folders of the project. These folders contain all the necessary files we need to use DataTables plugin in our project.
To make sure DataTables plugin render and format the table perfectly, we need to include DataTables CSS style sheet file jquery.dataTables.min.css. Open the _Layout.cshtml file and add the file reference in the <head> element.
<head>
    <meta charset="utf-8" />
    <meta name="viewport" content="width=device-width, initial-scale=1.0">
    <title>@ViewBag.Title - My ASP.NET Application</title>

    @Styles.Render("~/Content/css")
    @Scripts.Render("~/bundles/modernizr")

    <link href="~/Content/DataTables/css/jquery.dataTables.min.css" rel="stylesheet" />
</head>
Next we need to add the DataTables plugin JavaScript file jquery.dataTables.min.js on the page. Add the file reference just before the closing </body> element with the same _Layout.cshtml file.
    @Scripts.Render("~/bundles/jquery")
    @Scripts.Render("~/bundles/bootstrap")

    <script src="~/Scripts/DataTables/jquery.dataTables.min.js"></script>

    @RenderSection("scripts", required: false)
</body>
</html>
In this tutorial, I will be displaying the top 10 products from the Northwind Products table I have shown you earlier. I will display ProductID, ProductName, QuantityPerUnit, UnitPrice and UnitsInStock columns of the Products table. Open up the Index view in the Views/Home folder and add the following HTML table. I am using Bootstrap table classes for the styling of the table.
<table id="example" class="table table-condensed table-bordered table-striped">
    <thead>
        <tr>
           <th>Product ID</th>
           <th>Product Name</th>
           <th>Quantity Per Unit</th>
           <th>Unit Price</th>
           <th>Units In Stock</th>
        </tr>
    </thead>
</table>
Next step is initialize the DataTables plugin on the page with some options. Add the following script section at the bottom of the Index view file. We need to make sure that the id in our script matches the table id in the HTML.
@section scripts
{
    <script type="text/javascript">
        $(document).ready(function () {
            $('#example').DataTable({
                processing: true,
                serverSide: true,
                ordering: false,
                paging: false,
                searching: false,
                ajax: "api/Products",
                columns: [
                    { "data": "ProductID" },
                    { "data": "ProductName" },
                    { "data": "QuantityPerUnit" },
                    { "data": "UnitPrice" },
                    { "data": "UnitsInStock" }
                ]
            });
        });
    </script>
}
There are few important points to remember about the above code. DataTables can be used in two different modes:
- Client-side – where filtering, paging and sorting calculations are all performed in the web-browser.
- Server-side – where filtering, paging and sorting calculations are all performed by a server.
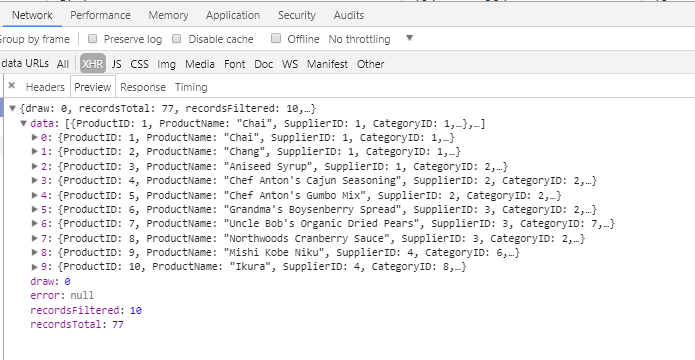
By default DataTables operates in client-side processing mode, but can be switched to server-side processing mode using serverSide option. When operating in server-side processing mode, DataTables will send parameters to the server indicating what data it needs (what page, what filters are applied etc.), and also expects certain parameters back in order that it has all the information required to display the table. We need to make sure that our ASP.NET Web API method GetProducts send all the parameters understood by the DataTables plugin so that it can render the data correctly. Following is the list of parameters DataTables expects will return from the server side. More detail about these parameters can be found in DataTables manual.
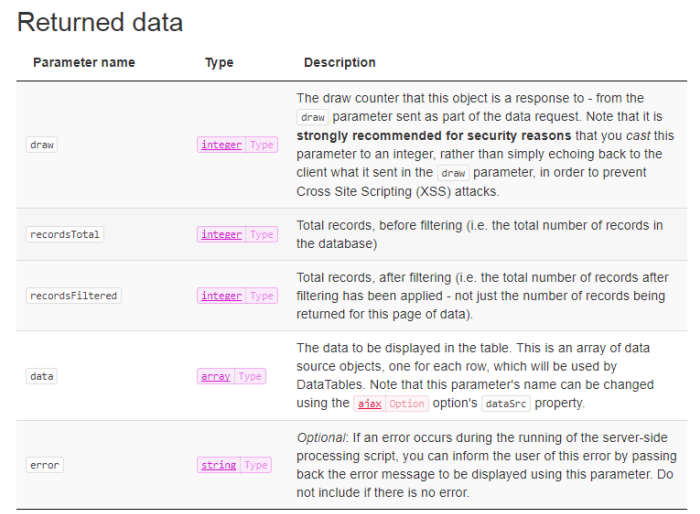
We need to create a class that has the above properties in it so let’s create a folder named DataTables in Models folder and add a following class called DataTableResponse inside the DataTables folder.
namespace ASPNET_MVC_Datatables.Models.DataTables
{
    public class DataTableResponse
    {
        public int draw { get; set; }
        public long recordsTotal { get; set; }
        public int recordsFiltered { get; set; }
        public object[] data { get; set; }
        public string error { get; set; }
    }
}
Adjust the code of GetProducts method and return the DataTableResponse objects instead of List we were returning before. We are still returning the list of top 10 products but this time they will be available within the data property understood by the DataTables plugin on the client side.
[HttpGet]
[Route("api/Products")]
public DataTableResponse GetProducts()
{
    var products = productRepository.GetProducts();

    return new DataTableResponse
    {
        recordsTotal = products.Count(),
        recordsFiltered = 10,
        data = products.Take(10).ToArray()
    };
}
For the sake of this tutorial, I have disabled sorting, paging and searching features of the plugin. I will show you how you can use these advance features with ASP.NET Web API in my next tutorial JQuery DataTables Paging, Sorting and Searching with ASP.NET Web API. It is now time to see the DataTables plugin in action. Build the project and press F5 within Visual Studio. You will see the following grid rendered in the browser.
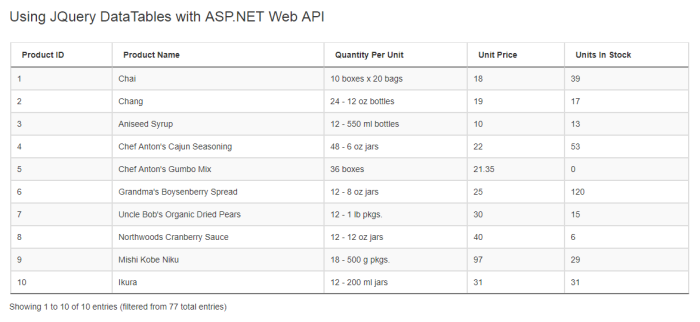
If you’re using Chrome, press F12 to open the developer tools. Go to Network tab and click XHR sub tab. You can see the parameters return from the server side clearly.
Summary
DataTables is a highly flexible and feature rich library to work with tables and listing. The library provides a lot of configuration options, custom plugins and a powerful API. It is impossible to discuss all plugin features in a single tutorial but I hope this tutorial will help you in understanding the basic concepts of JQuery DataTables. Please read my second tutorial JQuery DataTables Paging, Sorting and Searching with ASP.NET Web API to learn more about the DataTables plugin.





how i can use this sample to my senario(mssql (stored procedure) -bussines layer (model-control)- api layer-ui (getting data by ajax)